In this article, we will build the Spring boot application which will generate the QR Code. These days people are frequently using the QR Code to transfer the money to their relatives and friends.
Well QR Code not only used for money transfer, even if you booked the movie ticket then there will be a high possibility that you will get a ticket in the form of a QR Code. So, what actually QR Code is? Let’s first try to understand briefly.
What is QR Code?
It is one type of barcode basically it is a two-dimensional barcode which contains information in the form of a black square having a white background and that can only be read with the help of special electronic devices or smartphone.

These days QR Code gaining lots of popularity because it can store a large amount of information in a limited space.
Following are the information that QR Code can stored.
- Product Number.
- Product Name.
- Simple text.
- URL.
- Email Address.
- Secret Client Code.
- And many more.
Note: To get the Source Code please refer to the bottom section of this article.
For Video Tutorial please refer to bottom section of this article.
Now let’s see how to generate the QR Code using Spring Boot Application.
Follow the Steps mentioned below.
Step 1: Create a Project from Spring Initializr.
- Go to the Spring Initializr.
- Enter a Group name, com.pixeltrice.
- Mention the Artifact Id, spring-boot-QR-code-generator-app
- Add the Spring-Web dependency.
Step 2: Press on the Generate button, to get the project on your local system.
Step 3: Just unzip and extract the project that you have downloaded.
Step 4: Need to import the downloaded project in the Eclipse.
Select File -> Import -> Existing Maven Projects -> Browse -> Select the folder spring-boot-QR-code-generator-app-> Finish.
Step 5: Add the ZXing Library
We are using ZXing Library to generate the QR Code, so it required to add two more dependencies in the pom.xml file as shown below.
- Core image dependency
<dependency>
    <groupId>com.google.zxing</groupId>
    <artifactId>core</artifactId>
    <version>3.4.0</version>
</dependency>
2. Java Client dependency.
<dependency>
    <groupId>com.google.zxing</groupId>
    <artifactId>javase</artifactId>
    <version>3.4.0</version>
</dependency>
Step 6: Create a Class for QR Code Generator.
In this class we will define a method to generate the QR Code.
QRCodeGenerator.java
package com.pixeltrice.springbootQRcodegeneratorapp;

import java.io.ByteArrayOutputStream;
import java.io.IOException;
import java.nio.file.FileSystems;
import java.nio.file.Path;

import com.google.zxing.BarcodeFormat;
import com.google.zxing.WriterException;
import com.google.zxing.client.j2se.MatrixToImageWriter;
import com.google.zxing.common.BitMatrix;
import com.google.zxing.qrcode.QRCodeWriter;

public class QRCodeGenerator {

		public static void generateQRCodeImage(String text, int width, int height, String filePath)
	            throws WriterException, IOException {
	        QRCodeWriter qrCodeWriter = new QRCodeWriter();
	        BitMatrix bitMatrix = qrCodeWriter.encode(text, BarcodeFormat.QR_CODE, width, height);

	        Path path = FileSystems.getDefault().getPath(filePath);
	        MatrixToImageWriter.writeToPath(bitMatrix, "PNG", path);

	    }


		public static byte[] getQRCodeImage(String text, int width, int height) throws WriterException, IOException {
		    QRCodeWriter qrCodeWriter = new QRCodeWriter();
		    BitMatrix bitMatrix = qrCodeWriter.encode(text, BarcodeFormat.QR_CODE, width, height);

		    ByteArrayOutputStream pngOutputStream = new ByteArrayOutputStream();
		    MatrixToImageWriter.writeToStream(bitMatrix, "PNG", pngOutputStream);
		    byte[] pngData = pngOutputStream.toByteArray();
		    return pngData;
		}

}
In the above class, we have defined two methods, the first method is used to generate the QR Code in image form.
And the second method will generate the QR Code in the form of a byte array, which we used to return as a response for HTTP Request.
Step 7: Create a Controller Class.
In this step, we will create two API, first one is to generate the image form of the QR Code and also provide the path to save the QR Code automatically in the local system.
Another API will return the QR Code in the form of a byte array so that it can be used along with the HTML and javascript to display on the web pages.
QRCodeController.java
package com.pixeltrice.springbootQRcodegeneratorapp;

import org.springframework.http.HttpStatus;
import org.springframework.http.ResponseEntity;
import org.springframework.web.bind.annotation.GetMapping;
import org.springframework.web.bind.annotation.PathVariable;
import org.springframework.web.bind.annotation.RestController;

@RestController
public class QRCodeController {

	private static final String QR_CODE_IMAGE_PATH = "./src/main/resources/QRCode.png";


    @GetMapping(value = "/genrateAndDownloadQRCode/{codeText}/{width}/{height}")
		public void download(
				@PathVariable("codeText") String codeText,
				@PathVariable("width") Integer width,
				@PathVariable("height") Integer height)
			    throws Exception {
			        QRCodeGenerator.generateQRCodeImage(codeText, width, height, QR_CODE_IMAGE_PATH);
			    }

    @GetMapping(value = "/genrateQRCode/{codeText}/{width}/{height}")
   	public ResponseEntity<byte[]> generateQRCode(
   			@PathVariable("codeText") String codeText,
   			@PathVariable("width") Integer width,
   			@PathVariable("height") Integer height)
   		    throws Exception {
   		        return ResponseEntity.status(HttpStatus.OK).body(QRCodeGenerator.getQRCodeImage(codeText, width, height));
   		    }
}
APIs mentioned above will accept the three data in the form of Path Variable.
- codeText: We can pass any random text which can act as secret text when somebody scans the QR Code.
- width: Specify the width of the QR Code image.
- height: To specify the height of QR Code image.
In the above code, you can see we have specified the path “./src/main/resources/QRCode.png” where the QR Code Image will get saved.
Alright, we are good to go and run the application, but first, verify all the necessary dependencies are present in the pom.xml file.
pom.xml
<?xml version="1.0" encoding="UTF-8"?>
<project xmlns="http://maven.apache.org/POM/4.0.0" xmlns:xsi="http://www.w3.org/2001/XMLSchema-instance"
	xsi:schemaLocation="http://maven.apache.org/POM/4.0.0 https://maven.apache.org/xsd/maven-4.0.0.xsd">
	<modelVersion>4.0.0</modelVersion>
	<parent>
		<groupId>org.springframework.boot</groupId>
		<artifactId>spring-boot-starter-parent</artifactId>
		<version>2.3.3.RELEASE</version>
		<relativePath/> <!-- lookup parent from repository -->
	</parent>
	<groupId>com.pixeltrice</groupId>
	<artifactId>spring-boot-QR-code-generator-app</artifactId>
	<version>0.0.1-SNAPSHOT</version>
	<name>spring-boot-QR-code-generator-app</name>
	<description>Demo project for Spring Boot</description>

	<properties>
		<java.version>11</java.version>
	</properties>

	<dependencies>
		<dependency>
			<groupId>org.springframework.boot</groupId>
			<artifactId>spring-boot-starter-web</artifactId>
		</dependency>

			<dependency>
			    <groupId>com.google.zxing</groupId>
			    <artifactId>core</artifactId>
			    <version>3.4.0</version>
			</dependency>

			<dependency>
			    <groupId>com.google.zxing</groupId>
			    <artifactId>javase</artifactId>
			    <version>3.4.0</version>
			</dependency>

		<dependency>
			<groupId>org.springframework.boot</groupId>
			<artifactId>spring-boot-starter-test</artifactId>
			<scope>test</scope>
			<exclusions>
				<exclusion>
					<groupId>org.junit.vintage</groupId>
					<artifactId>junit-vintage-engine</artifactId>
				</exclusion>
			</exclusions>
		</dependency>
	</dependencies>

	<build>
		<plugins>
			<plugin>
				<groupId>org.springframework.boot</groupId>
				<artifactId>spring-boot-maven-plugin</artifactId>
			</plugin>
		</plugins>
	</build>

</project>
Step 8: Run the Appication.
Go to the browser or POSTMAN and hit the http://localhost:8080/genrateAndDownloadQRCode/code/350/350
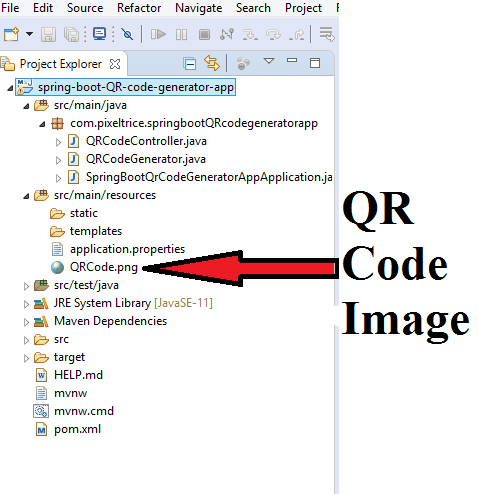
Now go inside the path src/main/resources and Right Click –> refresh the folder, you will able to see the QR Code Image saved with named QRCode.png

And the image will be look like as shown in below figure.
QRCode.png

Summary
In this article, we have learned to generate the QR Code using Spring Boot. If you face any difficultly or have some doubt please feel free to ask in the comment section, I will definitely help you. For Reference please download the source code I have provided the link.
You might also like this article.
- Build Spring Boot Chat Application from scratch
- Payment Integration With Paytm in Spring Boot Application
- Send OTP(One Time Password) Using Spring Boot Application for Authentication
- Make a Voice Call from Spring Boot Application to Mobile Phone
- How to send email using Spring Boot Application
- Spring Boot Security using OAuth2 with JWT
Sir can we develop an e-commerce application (online shopping) using spring boot and thyemeleaf
Yes, you can develop, it’s very easy and fun, You will learn so many things while building the eCommerce application. Give a try once, and try to implement every feature. You can take the reference from Amazon, Ebay, flipkart etc. for features and designing.