In this article we will learn “How to use the Elasticsearch with Spring Boot Application“. Here we will build Spring Boot application to perform all CRUD operation on Elasticsearch.
Introduction To Elasticsearch
Elasticsearch is a open search, free, distributed and analytics engine for all types of data, including textual, numerical, geospatial, structured, and unstructured. It is built on Apache Lucene and was first released in 2010 by Elasticsearch N.V. (now known as Elastic).
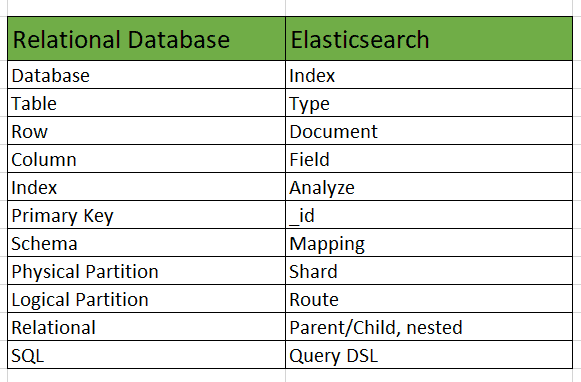
Relational Database vs Elasticsearch
Tools and Concepts used in this article:
- Spring Boot 2.7.2
- Spring Boot Starter Data Elasticsearch 2.7.1
- Elasticsearch 8.3.2
- Maven
- Java 17
Download and Install the Elasticsearch
The very first thing is we need to download Elasticsearch from here. Once you downloaded the zip file then extract it.
Note: The latest version of Elasticsearch while writing this article is 8.3.2.
Right Click on Elasticsearch zip file –> Extract Here
Once you extract, you will get a Elasticsearch folder.
Disable the default Security feature in Elasticsearch
Since here we are using Elasticsearch version above 8, so by default the security is enabled. For this project I have disable it to get better understanding of core feature of Elasticsearch.
Steps to Disable the Security in Elasticsearch
- Go inside the Elasticsearch Folder which you have extracted at the last and rename it as Elasticsearch.
- Open the Elasticsearch folder which you just renamed.
- Go inside config folder.
- Right click and open the elasticsearch.yml in Notepad++.
- Comment out all the properties related to security.
- Add the following properties inside the yml file.
ingest.geoip.downloader.enabled: false
xpack.security.enabled: false
xpack.security.transport.ssl.enabled: false
xpack.security.http.ssl.enabled: false
Note: You can skip the above Steps to Disable the Security in Elasticsearch. Download and replace the elasticsearch.yml with your existing one.
Steps to Run the Elasticsearch
- Go inside the Elasticsearch Folder which you have extracted at the last and rename it as Elasticsearch.
- Open the command prompt under the Elasticsearch folder.
- Enter the following command to run the Elasticsearch.
For Windows
.\bin\elasticsearch.batPress Enter, If everything works fine then Elasticsearch will start running on localhost:9200 and it will look like as shown in below figure.

For Unix based platform, please refer to here.
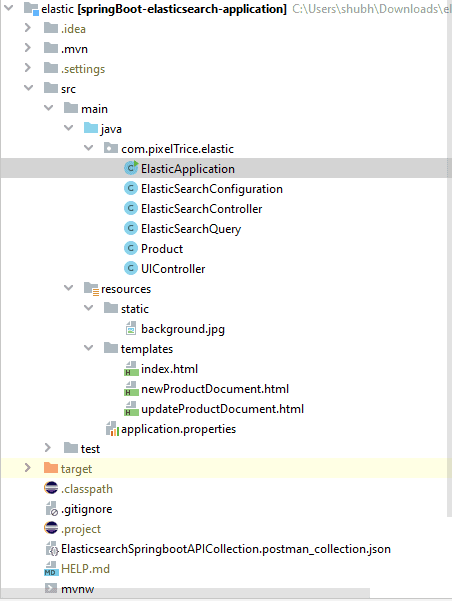
Final Project Structure
Create a Spring Boot Project
Step 1: Create a Project from Spring Initializr.
- Go to the Spring Initializr.
- Enter a Group name, com.pixeltrice.
- Mention the Artifact Id, springboot-elasticsearch-application.
- Select the java version 17.
- Add the following dependencies,
- Spring Web.
- Spring Data Elasticsearch (Access+Driver).
- Thymeleaf.
Note: You need to also add the dependency of jakarta.json-api. Get it from here.
Step 2: Click on the Generate button, the project will be download on your local system.
Step 3: Unzip and extract the project.
Step 4: Import the project in your IDE such as Eclipse/Intellij Idea
Select File -> Import -> Existing Maven Projects -> Browse -> Select the folder springboot-elasticsearch-application-> Finish.
Step 5: Create a Class to configuration to connect with Elasticsearch running in your system.
ElasticSearchConfiguration.java
package com.pixelTrice.elastic;

import co.elastic.clients.elasticsearch.ElasticsearchClient;
import co.elastic.clients.json.jackson.JacksonJsonpMapper;
import co.elastic.clients.transport.ElasticsearchTransport;
import co.elastic.clients.transport.rest_client.RestClientTransport;
import org.apache.http.HttpHost;
import org.elasticsearch.client.RestClient;
import org.springframework.context.annotation.Bean;
import org.springframework.context.annotation.Configuration;

@Configuration
public class ElasticSearchConfiguration
{
    @Bean
    public RestClient getRestClient() {
        RestClient restClient = RestClient.builder(
                new HttpHost("localhost", 9200)).build();
        return restClient;
    }

    @Bean
    public  ElasticsearchTransport getElasticsearchTransport() {
        return new RestClientTransport(
                getRestClient(), new JacksonJsonpMapper());
    }


    @Bean
    public ElasticsearchClient getElasticsearchClient(){
        ElasticsearchClient client = new ElasticsearchClient(getElasticsearchTransport());
        return client;
    }

}
Note: Make sure all the import statements are same as in above.
Explanation
- @Configuration: Indicates that the class can be used by the Spring IoC container as a source of bean definitions i.e it contains methods tag with @Bean which return the object.
- @Bean: It tells Spring that a method annotated with @Bean will return an object that should be registered as a bean in the Spring application context.
- getRestClient(…){}: This method use to configure the URL and port on which Elasticsearch is running.
- getElasticsearchTransport(…){}: It returns the Transport Object, whose purpose is it automatically map the our Model Class to JSON and integrates them with API Client.
- getElasticsearchClient(…){}: It returns a bean of elasticsearchclient, which we further use to perform all query operation with Elasticsearch.
Step 6: Create a Model Class.
Product.java
package com.pixelTrice.elastic;

import org.springframework.data.annotation.Id;
import org.springframework.data.elasticsearch.annotations.Document;
import org.springframework.data.elasticsearch.annotations.Field;
import org.springframework.data.elasticsearch.annotations.FieldType;

import java.util.Date;

@Document(indexName = "products")
public class Product {

    @Id
    private String id;

    @Field(type = FieldType.Text, name = "name")
    private String name;

    @Field(type = FieldType.Text, name = "description")
    private String description;

    @Field(type = FieldType.Double, name = "price")
    private double price;


   // Getter and Setter
}
Explanation
Above model class will represent the document structure in Elasticsearch which contains the mentioned fields. So whenever any document is created in index named “products“, then it will have the above 4 fields information.
@Document– To specify the index. ( in our case index name is “products”).@Id– Use to represent the field _id of document and it is unique for each message.@Field– It represents a different type of field that might be in our data.
Step 7: Create a Repository Class to perform all query operation on Elasticsearch
There are 3 ways from which one can perform create/read/search/update/delete operations on Elasticsearch.
- Using ElasticsearchClient
- ElasticsearchRestTemplate
- Spring Data Repository
Note: To use advanced queries like aggregation, suggestions, then it recommended to use either ElasticsearchClient or ElasticsearchRestTemplate (Spring Data library provides this template).
Here I am using the Elasticsearchclient.
ElasticSearchQuery.java
package com.pixelTrice.elastic;

import co.elastic.clients.elasticsearch.ElasticsearchClient;
import co.elastic.clients.elasticsearch.core.*;
import co.elastic.clients.elasticsearch.core.search.Hit;
import org.springframework.beans.factory.annotation.Autowired;
import org.springframework.stereotype.Repository;

import java.io.IOException;
import java.util.ArrayList;
import java.util.List;
import java.util.Objects;

@Repository
public class ElasticSearchQuery {

    @Autowired
    private ElasticsearchClient elasticsearchClient;

    private final String indexName = "products";


    public String createOrUpdateDocument(Product product) throws IOException {

        IndexResponse response = elasticsearchClient.index(i -> i
                .index(indexName)
                .id(product.getId())
                .document(product)
        );
        if(response.result().name().equals("Created")){
            return new StringBuilder("Document has been successfully created.").toString();
        }else if(response.result().name().equals("Updated")){
            return new StringBuilder("Document has been successfully updated.").toString();
        }
        return new StringBuilder("Error while performing the operation.").toString();
    }

    public Product getDocumentById(String productId) throws IOException{
        Product product = null;
        GetResponse<Product> response = elasticsearchClient.get(g -> g
                        .index(indexName)
                        .id(productId),
                Product.class
        );

        if (response.found()) {
             product = response.source();
            System.out.println("Product name " + product.getName());
        } else {
            System.out.println ("Product not found");
        }

       return product;
    }

    public String deleteDocumentById(String productId) throws IOException {

        DeleteRequest request = DeleteRequest.of(d -> d.index(indexName).id(productId));

        DeleteResponse deleteResponse = elasticsearchClient.delete(request);
        if (Objects.nonNull(deleteResponse.result()) && !deleteResponse.result().name().equals("NotFound")) {
            return new StringBuilder("Product with id " + deleteResponse.id() + " has been deleted.").toString();
        }
        System.out.println("Product not found");
        return new StringBuilder("Product with id " + deleteResponse.id()+" does not exist.").toString();

    }

    public  List<Product> searchAllDocuments() throws IOException {

        SearchRequest searchRequest =  SearchRequest.of(s -> s.index(indexName));
        SearchResponse searchResponse =  elasticsearchClient.search(searchRequest, Product.class);
        List<Hit> hits = searchResponse.hits().hits();
        List<Product> products = new ArrayList<>();
        for(Hit object : hits){

            System.out.print(((Product) object.source()));
            products.add((Product) object.source());

        }
        return products;
    }
}
Explanation
- createOrUpdateDocument(): If index does not exit in Elasticsearch, then it will create automatically and insert the document into it. And if document already present in that index then it will update the fields value under it.
- getDocumentById(): Used to fetch the document based on id.
- deleteDocumentById(): To delete the document based on id.
- searchAllDocuments(): Return all the documents present in that index.
Step 8: Create a Controller class
ElasticSearchController.java
package com.pixelTrice.elastic;


import org.springframework.beans.factory.annotation.Autowired;
import org.springframework.http.HttpStatus;
import org.springframework.http.ResponseEntity;
import org.springframework.web.bind.annotation.*;

import java.io.IOException;
import java.util.List;

@RestController
public class ElasticSearchController {

    @Autowired
    private ElasticSearchQuery elasticSearchQuery;

    @PostMapping("/createOrUpdateDocument")
    public ResponseEntity<Object> createOrUpdateDocument(@RequestBody Product product) throws IOException {
          String response = elasticSearchQuery.createOrUpdateDocument(product);
        return new ResponseEntity<>(response, HttpStatus.OK);
    }

    @GetMapping("/getDocument")
    public ResponseEntity<Object> getDocumentById(@RequestParam String productId) throws IOException {
       Product product =  elasticSearchQuery.getDocumentById(productId);
        return new ResponseEntity<>(product, HttpStatus.OK);
    }

    @DeleteMapping("/deleteDocument")
    public ResponseEntity<Object> deleteDocumentById(@RequestParam String productId) throws IOException {
        String response =  elasticSearchQuery.deleteDocumentById(productId);
        return new ResponseEntity<>(response, HttpStatus.OK);
    }

    @GetMapping("/searchDocument")
    public ResponseEntity<Object> searchAllDocument() throws IOException {
        List<Product> products = elasticSearchQuery.searchAllDocuments();
        return new ResponseEntity<>(products, HttpStatus.OK);
    }
}
Explanation
- @PostMapping(“/createOrUpdateDocument”): Create or update the document.
- @GetMapping(“/getDocument”): To fetch the document from index.
- @DeleteMapping(“/deleteDocument”): Use to delete the document.
- @GetMapping(“/searchDocument”): Return list of the documents present in the index.
Note: Up to this step you can easily able to create/read/update/delete the documents present in Elasticsearch using POSTMAN. Please download and import the .json in POSTMAN to get APIs Collection.
But if you are interested in adding some UI ( Frontend part), to give some look and view to the application, then you are most welcome to follow further steps.
Step 9: Add html file in folder “src/main/resources/templates“
If the templates folder does not exist then please create it manually. Use this link to get all html file and place it under templates folder.
Step 10: Add the UI Controller Class
package com.pixelTrice.elastic;

import org.springframework.beans.factory.annotation.Autowired;
import org.springframework.stereotype.Controller;
import org.springframework.ui.Model;
import org.springframework.web.bind.annotation.*;

import java.io.IOException;

@Controller
public class UIController {

    @Autowired
    private ElasticSearchQuery elasticSearchQuery;

    @GetMapping("/")
    public String viewHomePage(Model model) throws IOException {
        model.addAttribute("listProductDocuments",elasticSearchQuery.searchAllDocuments());
        return "index";
    }

    @PostMapping("/saveProduct")
    public String saveProduct(@ModelAttribute("product") Product product) throws IOException {
        elasticSearchQuery.createOrUpdateDocument(product);
        return "redirect:/";
    }

    @GetMapping("/showFormForUpdate/{id}")
    public String showFormForUpdate(@PathVariable(value = "id") String id, Model model) throws IOException {

        Product product = elasticSearchQuery.getDocumentById(id);
        model.addAttribute("product", product);
        return "updateProductDocument";
    }

    @GetMapping("/showNewProductForm")
    public String showNewEmployeeForm(Model model) {
        // create model attribute to bind form data
        Product product = new Product();
        model.addAttribute("product", product);
        return "newProductDocument";
    }

    @GetMapping("/deleteProduct/{id}")
    public String deleteProduct(@PathVariable(value = "id") String id) throws IOException {

        this.elasticSearchQuery.deleteDocumentById(id);
        return "redirect:/";
    }
}
Explanation
- @GetMapping(“/”): It will return the homepage of application.
- @PostMapping(“/saveProduct”): Use to create the product Document in the index.
- @GetMapping(“/showFormForUpdate/{id}”): It will show the page to update the exitsing document.
- @GetMapping(“/showNewProductForm”): To create a new document which contains product details.
- @GetMapping(“/deleteProduct/{id}”): To delete the existing document of product based of ID.
Note: Please use @Controller annotation, never use @RestController in this class, since @RestController annotation internally also have @ResponseBody annotation which automatically convert/serialize the response into JSON, which we don’t want in this class since we are trying achieve MVC and need to return html page.
Step 11: Run the application and perform all CRUD Operation
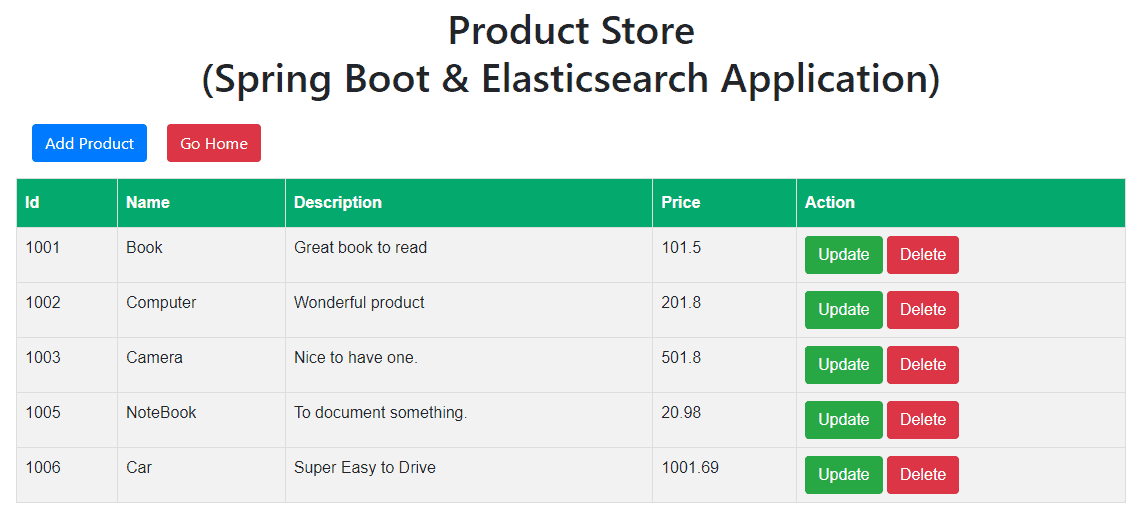
Please make sure your Elasticsearch is UP and running on your system. Once you run, the home page will be look like as shown below.
Final Project Structure
Summary
In this article, we have learned how to add and configure the Elasticsearch in the Spring Boot Application. If you have any doubts or query please feel free to ask me any time in the comment section down below.
You might also like this article.
- Integrate Apache Kafka in Spring Boot Application
- Payment Integration With Paytm in Spring Boot Application
- Send OTP(One Time Password) Using Spring Boot Application for Authentication
- Make a Voice Call from Spring Boot Application to Mobile Phone
- How to send email using Spring Boot Application
- Spring Boot Security using OAuth2 with JWT
Reference Articles