In this article, we will learn to implement the Paytm as a Payment Gateway in our spring boot application. As we already know it is one of the most popular services which enables the fastest and safest way of doing payment over the internet.
Here we will create a project from scratch and integrate the Paytm so that anybody can do the payment through our spring boot application.
Let’s begin, just follow each and every step and in the end, we will have the final application ready.
Note: I have given the source code in the bottom of this article.
Video Tutorial is available in the bottom of this article.
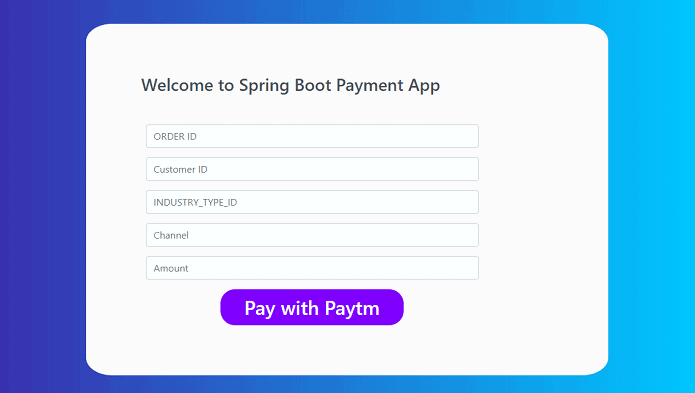
Final Project
Step 1: Create a Project from Spring Initializr.
- Go to the Spring Initializr.
- Enter a Group name, com.pixeltrice.
- Mention the Artifact Id, spring-boot-paytm-payment
- Add the following dependencies,
- Spring Web.
- Spring Boot DevTools.
- Thymleaf
Step 2: Click on the Generate button, the project will be downloaded on your local system.
Step 3: Unzip and extract the project.
Step 4: Import the project in your IDE such as Eclipse.
Select File -> Import -> Existing Maven Projects -> Browse -> Select the folder spring-boot-paytm-payment-> Finish.
Step 5: Get Paytm Properties such as Merchant ID, Merchant Key, etc.
- Login or Sign up to your Paytm account. https://dashboard.paytm.com/
- Go to the Developer setting on the left-hand side of the site.
- Choose API Keys.
- Select Generate Test API Details.
- You will get Test Merchant ID and Test Merchant Key.
Step 6: Configure the application.properties file.
Placed the Paytm properties in your application.properties file as shown below.
################ Paytm Properties #########################
paytm.payment.sandbox.merchantId:your merchant ID
paytm.payment.sandbox.merchantKey: your merchant key
paytm.payment.sandbox.channelId:WEB
paytm.payment.sandbox.industryTypeId:Retail
paytm.payment.sandbox.website:WEBSTAGING
paytm.payment.sandbox.paytmUrl:https://securegw-stage.paytm.in/order/process
paytm.payment.sandbox.callbackUrl:http://localhost:8080/pgresponse
paytm.payment.sandbox.details.MID: ${paytm.payment.sandbox.merchantId}
paytm.payment.sandbox.details.CHANNEL_ID: ${paytm.payment.sandbox.channelId}
paytm.payment.sandbox.details.INDUSTRY_TYPE_ID: ${paytm.payment.sandbox.industryTypeId}
paytm.payment.sandbox.details.WEBSITE: ${paytm.payment.sandbox.website}
paytm.payment.sandbox.details.CALLBACK_URL: ${paytm.payment.sandbox.callbackUrl}
paytm.mobile = your paytm registered mobile number
paytm.email = your email address
You will all the properties from the Paytm dashboard screen under the developer setting as shown in the figure.
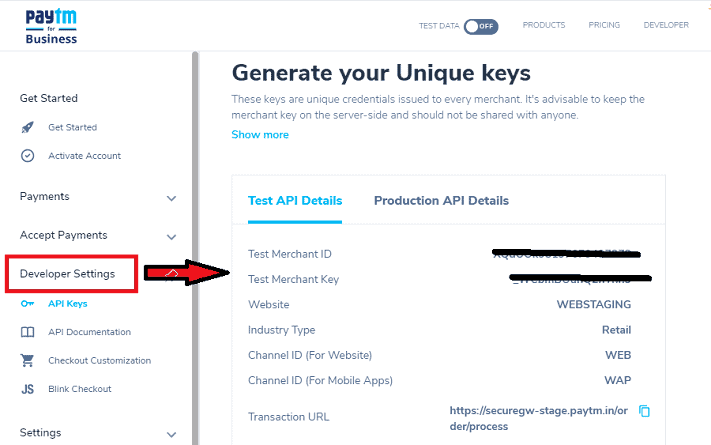
Note: All the properties will be the same as mentioned in the application.properties file, only you need to add your Merchant ID, Merchant Key, mobile number, and email address.
Follow the Step 5 to get Merchant ID and Merchant Key.
Step 7: Create a Model or Pojo Class
PaytmDetailPojo.java
package com.pixeltrice.springbootpaytmpayment;

import java.util.Map;

import org.springframework.boot.context.properties.ConfigurationProperties;
import org.springframework.stereotype.Component;


@Component
@ConfigurationProperties("paytm.payment.sandbox")
public class PaytmDetailPojo {

	private String merchantId;

	private String merchantKey;

	private String channelId;

	private String website;

	private String industryTypeId;

	private String paytmUrl;

	private Map<String, String> details;

	public PaytmDetailPojo() {}


	public PaytmDetailPojo(String merchantId, String merchantKey, String channelId, String website,
			String industryTypeId, String paytmUrl, Map<String, String> details) {
		super();
		this.merchantId = merchantId;
		this.merchantKey = merchantKey;
		this.channelId = channelId;
		this.website = website;
		this.industryTypeId = industryTypeId;
		this.paytmUrl = paytmUrl;
		this.details = details;
	}
//getter and setter method
@ConfigurationProperties(“paytm.payment.sandbox”): This annotation will initialize the variable with the values of the properties named starts paytm.payment.sandbox in the application.properties files.
Step 8: Create a PaymentController.java
In this controller class, we will define the all-important API required to do payment through Paytm.
PaymentController.java
package com.pixeltrice.springbootpaytmpayment;

import java.util.Map;
import java.util.Map.Entry;
import java.util.TreeMap;

import javax.servlet.http.HttpServletRequest;

import org.springframework.beans.factory.annotation.Autowired;
import org.springframework.core.env.Environment;
import org.springframework.stereotype.Controller;
import org.springframework.ui.Model;
import org.springframework.web.bind.annotation.GetMapping;
import org.springframework.web.bind.annotation.PostMapping;
import org.springframework.web.bind.annotation.RequestParam;
import org.springframework.web.servlet.ModelAndView;

import com.paytm.pg.merchant.PaytmChecksum;

@Controller
public class PaymentController {

	@Autowired
	private PaytmDetailPojo paytmDetailPojo;
	@Autowired
	private Environment env;

	@GetMapping("/")
	public String home() {
		return "home";
	}

	 @PostMapping(value = "/submitPaymentDetail")
	    public ModelAndView getRedirect(@RequestParam(name = "CUST_ID") String customerId,
	                                    @RequestParam(name = "TXN_AMOUNT") String transactionAmount,
	                                    @RequestParam(name = "ORDER_ID") String orderId) throws Exception {

	        ModelAndView modelAndView = new ModelAndView("redirect:" + paytmDetailPojo.getPaytmUrl());
	        TreeMap<String, String> parameters = new TreeMap<>();
	        paytmDetailPojo.getDetails().forEach((k, v) -> parameters.put(k, v));
	        parameters.put("MOBILE_NO", env.getProperty("paytm.mobile"));
	        parameters.put("EMAIL", env.getProperty("paytm.email"));
	        parameters.put("ORDER_ID", orderId);
	        parameters.put("TXN_AMOUNT", transactionAmount);
	        parameters.put("CUST_ID", customerId);
	        String checkSum = getCheckSum(parameters);
	        parameters.put("CHECKSUMHASH", checkSum);
	        modelAndView.addAllObjects(parameters);
	        return modelAndView;
	    }


	 @PostMapping(value = "/pgresponse")
	    public String getResponseRedirect(HttpServletRequest request, Model model) {

	        Map<String, String[]> mapData = request.getParameterMap();
	        TreeMap<String, String> parameters = new TreeMap<String, String>();
	        String paytmChecksum = "";
	        for (Entry<String, String[]> requestParamsEntry : mapData.entrySet()) {
	            if ("CHECKSUMHASH".equalsIgnoreCase(requestParamsEntry.getKey())){
	                paytmChecksum = requestParamsEntry.getValue()[0];
	            } else {
	            	parameters.put(requestParamsEntry.getKey(), requestParamsEntry.getValue()[0]);
	            }
	        }
	        String result;

	        boolean isValideChecksum = false;
	        System.out.println("RESULT : "+parameters.toString());
	        try {
	            isValideChecksum = validateCheckSum(parameters, paytmChecksum);
	            if (isValideChecksum && parameters.containsKey("RESPCODE")) {
	                if (parameters.get("RESPCODE").equals("01")) {
	                    result = "Payment Successful";
	                } else {
	                    result = "Payment Failed";
	                }
	            } else {
	                result = "Checksum mismatched";
	            }
	        } catch (Exception e) {
	            result = e.toString();
	        }
	        model.addAttribute("result",result);
	        parameters.remove("CHECKSUMHASH");
	        model.addAttribute("parameters",parameters);
	        return "report";
	    }

	    private boolean validateCheckSum(TreeMap<String, String> parameters, String paytmChecksum) throws Exception {
	        return PaytmChecksum.verifySignature(parameters,
	                paytmDetailPojo.getMerchantKey(), paytmChecksum);
	    }
	private String getCheckSum(TreeMap<String, String> parameters) throws Exception {
		return PaytmChecksum.generateSignature(parameters, paytmDetailPojo.getMerchantKey());
	}

}
Explanation of Each line of code.
- API to display the Payment Form.
@GetMapping("/")
	public String home() {
		return "home";
	}
Since we have implemented the Thymleaf in our project, so when this API gets called then it will return home.html, where we will write the HTML to display the form as shown below.
home.html
<!DOCTYPE html>
<html lang="en" xmlns:th="http://www.thymeleaf.org">
<head>
    <meta charset="UTF-8"/>
    <title>Title</title>
    <link rel="stylesheet" th:href="@{/style.css}"/>
    <link href="//maxcdn.bootstrapcdn.com/bootstrap/4.1.1/css/bootstrap.min.css" rel="stylesheet" id="bootstrap-css"/>
    <script src="//maxcdn.bootstrapcdn.com/bootstrap/4.1.1/js/bootstrap.min.js"></script>
    <script src="//cdnjs.cloudflare.com/ajax/libs/jquery/3.2.1/jquery.min.js"></script>
</head>
<body>
<form method="post" action="/submitPaymentDetail">
    <div class="container register">
        <div class="row">
            <div class="col-md-3 register-left">
            </div>
            <div class="col-md-9 register-right">
                <div class="tab-content" id="myTabContent">
                    <div class="tab-pane fade show active" id="home" role="tabpanel" aria-labelledby="home-tab">
                        <h3 class="register-heading">Welcome to Paytm Pay Payment</h3>
                        <div class="row register-form">
                            <div class="col-md-10">
                                <div class="form-group">
                                    <input id="ORDER_ID" tabindex="1" maxlength="20" size="20"
                                           name="ORDER_ID" autocomplete="off" class="form-control" >
                                </div>
                                <div class="form-group">
                                    <input type="text" class="form-control" placeholder="Customer ID" value=""
                                           name="CUST_ID"/>
                                </div>
                                <div class="form-group">
                                    <input type="text" class="form-control" placeholder="INDUSTRY_TYPE_ID" value=""
                                           name="INDUSTRY_TYPE_ID"/>
                                </div>
                                <div class="form-group">
                                    <input type="text" class="form-control" placeholder="Channel" value=""
                                           name="CHANNEL_ID"/>
                                </div>
                                <div class="form-group">
                                    <input type="text" class="form-control" placeholder="Amount" value=""
                                           name="TXN_AMOUNT"/>
                                </div>
                                <button type="submit" class="btnRegister" style="align : center">Pay with Paytm</button>
                            </div>
                        </div>
                    </div>
                </div>
            </div>
        </div>
    </div>
</form>
</body>
</html>
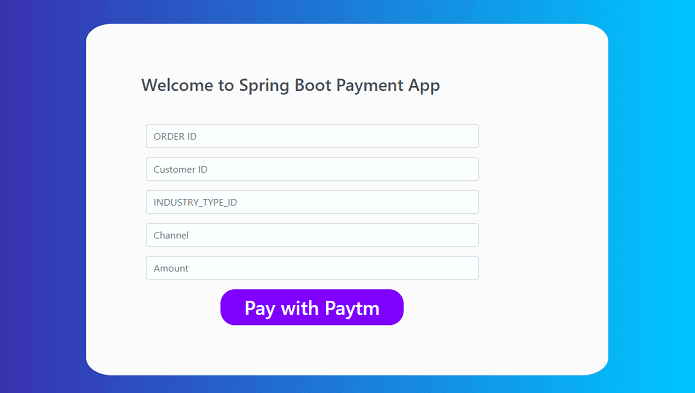
The above HTML will display the form as shown in below figure, once you fill all the details and press on “Pay with Paytm” button, it will call the API as mentioned in <form method=”post” action=”/submitPaymentDetail”> that is /submitPaymentDetail .
2. API /submitPaymentDetail Explanation.
 @PostMapping(value = "/submitPaymentDetail")
	    public ModelAndView getRedirect(@RequestParam(name = "CUST_ID") String customerId,
	                                    @RequestParam(name = "TXN_AMOUNT") String transactionAmount,
	                                    @RequestParam(name = "ORDER_ID") String orderId) throws Exception {

	        ModelAndView modelAndView = new ModelAndView("redirect:" + paytmDetailPojo.getPaytmUrl());
	        TreeMap<String, String> parameters = new TreeMap<>();
	        paytmDetailPojo.getDetails().forEach((k, v) -> parameters.put(k, v));
	        parameters.put("MOBILE_NO", env.getProperty("paytm.mobile"));
	        parameters.put("EMAIL", env.getProperty("paytm.email"));
	        parameters.put("ORDER_ID", orderId);
	        parameters.put("TXN_AMOUNT", transactionAmount);
	        parameters.put("CUST_ID", customerId);
	        String checkSum = getCheckSum(parameters);
	        parameters.put("CHECKSUMHASH", checkSum);
	        modelAndView.addAllObjects(parameters);
	        return modelAndView;
	    }
This API will get triggered once your press on the “Pay with Paytm” button after filling all the fields on the form as we saw above. This API will accept the three parameters as a request parameter.
- customerId.
- transactionAmount.
- orderId.
Explanation
- ModelAndView modelAndView = new ModelAndView(“redirect:” + paytmDetailPojo.getPaytmUrl())
Created an object of ModelAndView in which we are passing the PaytmUrl which we already assigned the value in the application.properties file.
paytm.payment.sandbox.paytmUrl:https://securegw-stage.paytm.in/order/process
2 Adding all parameters in the ModelAndView Object.
 TreeMap<String, String> parameters = new TreeMap<>();
	        paytmDetailPojo.getDetails().forEach((k, v) -> parameters.put(k, v));
	        parameters.put("MOBILE_NO", env.getProperty("paytm.mobile"));
	        parameters.put("EMAIL", env.getProperty("paytm.email"));
	        parameters.put("ORDER_ID", orderId);
	        parameters.put("TXN_AMOUNT", transactionAmount);
	        parameters.put("CUST_ID", customerId);
	        String checkSum = getCheckSum(parameters);
	        parameters.put("CHECKSUMHASH", checkSum);
	        modelAndView.addAllObjects(parameters);
In the above code, I have uses the env.getProperty() to get the value of mobile and email from the application.properties file, env is the Object Reference of a predefined class of spring framework named Environment. I have already Autowired this class.
@Autowired
private Environment env;
One more line of code which you might not able to understand, that is
String checkSum = getCheckSum(parameters);The above line of code will call the getCheckSum() method.
3. getCheckSum() Explanation
private String getCheckSum(TreeMap<String, String> parameters) throws Exception {
		return PaytmChecksum.generateSignature(parameters, paytmDetailPojo.getMerchantKey());
	}
This method will generate a checksum based on the MerchantKey and parameters. If you notice, we are using a PaytmChecksum class in the return statement to get the checkSum.
PaytmChecksum
This class is present in com.paytm.pg.merchant.PaytmChecksum in the paytm-checksum-2.0.0.jar file, so we need to place this jar file in the classpath so that we can import the package where PaytmChecksum class has defined.
Steps to Place the paytm-checksum-2.0.0.jar file on classpath in Eclipse.
- Add the following maven repository in your pom.xml
<repositories>
    <repository>
        <id>my-repo1</id>
        <url> http://artifactorypg.paytm.in/artifactory/libs-release </url>
    </repository>
</repositories>
2. Placed the dependency for checksum in pom.xml
<dependency>
    <groupId>com.paytm</groupId>
    <artifactId>paytm-checksum</artifactId>
</dependency>
4. Response API Explanation.
Once the Payment completed the API /pgresponse gets triggered and it will display the payment details on your screen.
	 @PostMapping(value = "/pgresponse")
	    public String getResponseRedirect(HttpServletRequest request, Model model) {

	        Map<String, String[]> mapData = request.getParameterMap();
	        TreeMap<String, String> parameters = new TreeMap<String, String>();
	        String paytmChecksum = "";
	        for (Entry<String, String[]> requestParamsEntry : mapData.entrySet()) {
	            if ("CHECKSUMHASH".equalsIgnoreCase(requestParamsEntry.getKey())){
	                paytmChecksum = requestParamsEntry.getValue()[0];
	            } else {
	            	parameters.put(requestParamsEntry.getKey(), requestParamsEntry.getValue()[0]);
	            }
	        }
	        String result;

	        boolean isValideChecksum = false;
	        System.out.println("RESULT : "+parameters.toString());
	        try {
	            isValideChecksum = validateCheckSum(parameters, paytmChecksum);
	            if (isValideChecksum && parameters.containsKey("RESPCODE")) {
	                if (parameters.get("RESPCODE").equals("01")) {
	                    result = "Payment Successful";
	                } else {
	                    result = "Payment Failed";
	                }
	            } else {
	                result = "Checksum mismatched";
	            }
	        } catch (Exception e) {
	            result = e.toString();
	        }
	        model.addAttribute("result",result);
	        parameters.remove("CHECKSUMHASH");
	        model.addAttribute("parameters",parameters);
	        return "report";
	    }
If you notice in the above method, it is also validating the checksum and finally displaying the data on the report.html file.
For validating the checksum we defined a method validateCheckSum().
 private boolean validateCheckSum(TreeMap<String, String> parameters, String paytmChecksum) throws Exception {
	        return PaytmChecksum.verifySignature(parameters,
	                paytmDetailPojo.getMerchantKey(), paytmChecksum);
	    }
report.html
<!DOCTYPE html>
<html lang="en" xmlns:th="http://www.thymeleaf.org">

<head>
    <meta charset="UTF-8"/>
    <title>Payment Report</title>
    <link href="//netdna.bootstrapcdn.com/bootstrap/3.0.0/css/bootstrap.min.css" rel="stylesheet" id="bootstrap-css"/>
    <script src="//netdna.bootstrapcdn.com/bootstrap/3.0.0/js/bootstrap.min.js"></script>
    <script src="//code.jquery.com/jquery-1.11.1.min.js"></script>
</head>
<body>
<div class="container">
    <div class="row">
        <div class="well col-xs-10 col-sm-10 col-md-6 col-xs-offset-1 col-sm-offset-1 col-md-offset-3">
            <div class="row">
                <div class="col-xs-6 col-sm-6 col-md-6">
                    <strong th:text="${result}"></strong>
                    <br>
                </div>
                <div class="col-xs-6 col-sm-6 col-md-6 text-right">
                    <p>
                        <em>Receipt #: 34522677W</em>
                    </p>
                </div>
            </div>
            <div class="row">
                <div class="text-center">
                    <h1>Receipt</h1>
                </div>

                <table class="table table-hover">
                    <thead>
                    <tr>
                        <th>Components</th>
                    </tr>
                    </thead>
                    <tbody>

                    <tr th:each="entry : ${parameters}">

                        <td th:text="${entry.key} + '  : -  ' + ${entry.value}"></td>

                    </tr>
                    </tbody>
                </table>
            </div>
        </div>
    </div>
</div>
</body>
</html>
Note: Make sure you should place both HTML file in the following path src\main\resources\templates
Step 9: Add some style to HTML Pages.
Create style.css in the following path src\main\resources\static.
.register{
    background: -webkit-linear-gradient(left, #3931af, #00c6ff);
    margin-top: 3%;
    padding: 3%;
}
.register-left{
    text-align: center;
    color: #fff;
    margin-top: 4%;
}
.register-left input{
    border: none;
    border-radius: 1.5rem;
    padding: 2%;
    width: 60%;
    background: orange;
    font-weight: bold;
    color: #383d41;
    margin-top: 30%;
    margin-bottom: 3%;
    cursor: pointer;
}
.register-right{
    background: #f8f9fa;
    border-top-left-radius:  5%;
    border-bottom-left-radius:  5%;
     border-top-right-radius:  5%;
    border-bottom-right-radius: 5%;
        margin-left: 12.5%;

}
.register-left img{
    margin-top: 15%;
    margin-bottom: 5%;
    width: 25%;
    -webkit-animation: mover 2s infinite  alternate;
    animation: mover 1s infinite  alternate;
}
@-webkit-keyframes mover {
    0% { transform: translateY(0); }
    100% { transform: translateY(-20px); }
}
@keyframes mover {
    0% { transform: translateY(0); }
    100% { transform: translateY(-20px); }
}
.register-left p{
    font-weight: lighter;
    padding: 12%;
    margin-top: -9%;
}
.register .register-form{
    padding: 10%;
    margin-top: 10%;
}
.btnRegister {
    border: none;
    border-radius: 1.5rem;
    background: #8000ff;
    color: #fff;
    font-weight: 600;
    width: 55%;
    cursor: pointer;
    padding: 1%;
    font-size: xx-large;
 /*   margin-top: 3px;*/
 margin:auto;
  display:block
}
.register .nav-tabs{
    margin-top: 3%;
    border: none;
    background: #0062cc;
    border-radius: 1.5rem;
    width: 28%;
    float: right;
}
.register .nav-tabs .nav-link{
    padding: 2%;
    height: 34px;
    font-weight: 600;
    color: #fff;
    border-top-right-radius: 1.5rem;
    border-bottom-right-radius: 1.5rem;
}
.register .nav-tabs .nav-link:hover{
    border: none;
}
.register .nav-tabs .nav-link.active{
    width: 100px;
    color: #0062cc;
    border: 2px solid #0062cc;
    border-top-left-radius: 1.5rem;
    border-bottom-left-radius: 1.5rem;
}

.register-heading {
    /* text-align: center; */
    /* margin-top: 8%; */
    margin-bottom: -15%;
    color: #495057;
    float: left;
    /* margin-left: 0px; */
    padding-left: 75px;
}
Now we are good to go and run the Application. But before Running make sure that you have all the dependencies as mentioned in the pom.xml file.
pom.xml
<?xml version="1.0" encoding="UTF-8"?>
<project xmlns="http://maven.apache.org/POM/4.0.0" xmlns:xsi="http://www.w3.org/2001/XMLSchema-instance"
	xsi:schemaLocation="http://maven.apache.org/POM/4.0.0 https://maven.apache.org/xsd/maven-4.0.0.xsd">
	<modelVersion>4.0.0</modelVersion>
	<parent>
		<groupId>org.springframework.boot</groupId>
		<artifactId>spring-boot-starter-parent</artifactId>
		<version>2.3.3.RELEASE</version>
		<relativePath/> <!-- lookup parent from repository -->
	</parent>
	<groupId>com.pixeltrice</groupId>
	<artifactId>spring-boot-paytm-payment</artifactId>
	<version>0.0.1-SNAPSHOT</version>
	<name>spring-boot-paytm-payment</name>
	<description>Demo project for Spring Boot</description>

	<properties>
		<java.version>1.8</java.version>
	</properties>

	<repositories>
    <repository>
        <id>my-repo1</id>
        <url> http://artifactorypg.paytm.in/artifactory/libs-release </url>
    </repository>
</repositories>

	<dependencies>
		<dependency>
			<groupId>org.springframework.boot</groupId>
			<artifactId>spring-boot-starter-thymeleaf</artifactId>
		</dependency>
		<dependency>
			<groupId>org.springframework.boot</groupId>
			<artifactId>spring-boot-starter-web</artifactId>
		</dependency>

		<dependency>
    <groupId>com.paytm</groupId>
    <artifactId>paytm-checksum</artifactId>
    <version>1.2.0</version>
</dependency>

		<dependency>
			<groupId>org.springframework.boot</groupId>
			<artifactId>spring-boot-devtools</artifactId>
			<scope>runtime</scope>
			<optional>true</optional>
		</dependency>
		<dependency>
			<groupId>org.springframework.boot</groupId>
			<artifactId>spring-boot-starter-test</artifactId>
			<scope>test</scope>
			<exclusions>
				<exclusion>
					<groupId>org.junit.vintage</groupId>
					<artifactId>junit-vintage-engine</artifactId>
				</exclusion>
			</exclusions>
		</dependency>
	</dependencies>

	<build>
		<plugins>
			<plugin>
				<groupId>org.springframework.boot</groupId>
				<artifactId>spring-boot-maven-plugin</artifactId>
			</plugin>
		</plugins>
	</build>

</project>
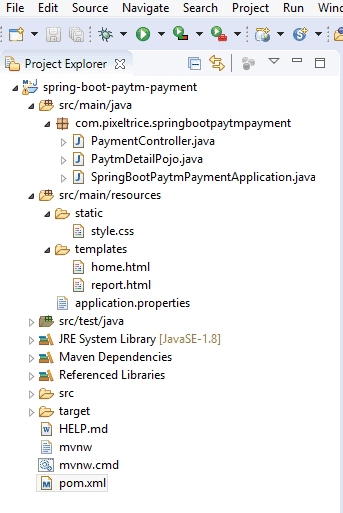
Final Project Structure.
Step 10: Run the Application.
Go to localhost:8080 and fill the necessary details as shown in below figure.
Once you click on “Pay with Paytm” button you will redirect to the screen as shown below.
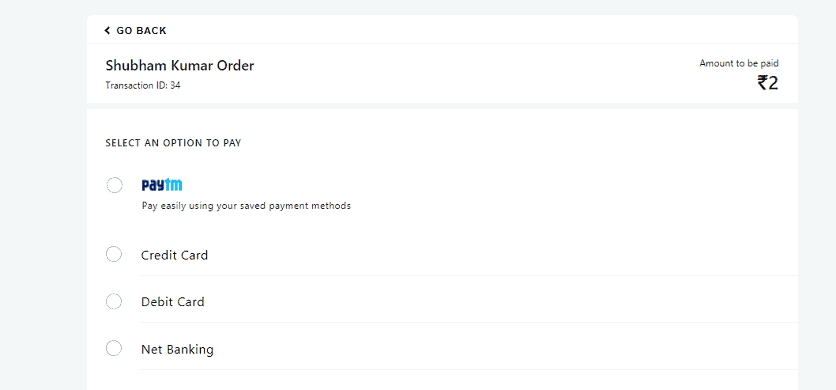
Select any of the payment mode and proceed for the payment. Once everything is done, you will able to see the Payment Successful Screen along with Payment Receipt.
Summary
In this article we have learned to implment the Paytm in our spring boot application. If you have any queries or doubts please feel free to ask, I am always ready to answer your queries.
You might also like this article.
- Send OTP(One Time Password) Using Spring Boot Application for Authentication
- Make a Voice Call from Spring Boot Application to Mobile Phone
- Send an SMS or Message from Spring Boot Application to Mobile Phone
- How to send email using Spring Boot Application
- Spring Boot Security using OAuth2 with JWT
- Build Spring Boot Restful CRUD API with Hibernate and Postgresql from scratch
Respected sir,
I tried many times, all time same problem “2nd page don’t show (https://www.pixeltrice.com/wp-content/uploads/2020/09/paytm5.png)” . But 3rd page show with “Checksum mismatched”.
I am very sad. please check soon and tell me. I look forward to hearing from you
Really sorry for the inconvenience. And Thank You so much for informing me. I have fixed the issue and updated the changes in the article as well as in code on my Github.
Hi Sir I am getting result as checksum mismatched.
Can u tell e what is the fix for this code. Iread the above comments getting same issue. Not able to find where is the change on github project.
Yes sure. In the PaymentController.java replace the method logic of getResponseRedirect(HttpServletRequest request, Model model) with the latest one.
Hi Shivam, Just now I have fixed that checkSum mismatch issue. And updated in the article as well as in the code on Github.
You can check it on : https://github.com/sk444/spring-boot-paytm-payment
Thanks Sir. Worked like a charm.
Most Welcome.