In this article, we will build the spring boot application from scratch and add the feature to import the CSV file into MySql Database. If you ever got a chance to work on real-time projects then you definitely come across the point where you have to implement file upload and download feature in the application.
Even these days over the internet, file upload and download are some of the most frequent activities performed by the users.
If you are interested to learn in detail to build such type of application where you can upload and download any type of files such as png, jpg, mp3, pdf, etc. then please follows the below-mentioned link.
- Article: Upload and download the files using Spring Boot Application
- Video Tutorial: Upload and download the files using Spring Boot
In this article we only focused on CSV File, the following are the things we are going to perform with CSV File.
- Store the CSV File data in MySQL Database.
- Fetch the list of data from the MySQL table.
- Download the CSV file.
Note: Source code is available in the bottom section of this article.
Video Tutorial available in the bottom section.
What is CSV File?
The answer to this question is in the full name of CSV, which is Comma-separated values. So, the file which contains the values separated with comma, then that is a CSV File. It will look as shown below.
- If you store the data in Notepad and saved the file with .csv extention.
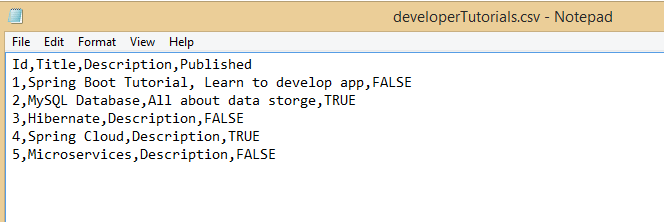
Id,Title,Description,Published
1,Spring Boot Tutorial, Learn to develop app,FALSE
2,MySQL Database,All about data storge,TRUE
3,Hibernate,Description,FALSE
4,Spring Cloud,Description,TRUE
5,Microservices,Description,FALSE
2. In Excel the data will look like as shown below.
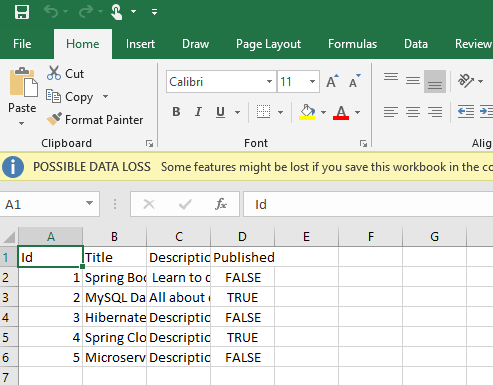
Above the CSV file, we are going to use in our spring boot application, and import all the data to MySQL Database.
So, let us build the application from scratch.
Follow each and every steps stricly as mentioned below.
Step 1: Create a Project from Spring Initializr.
- Go to the Spring Initializr.
- Enter a Group name, com.pixeltrice.
- Mention the Artifact Id, spring-boot-import-csv-file-app
- Add the following dependencies,
- Spring Web.
- Spring Data JPA.
- MySQL Driver.
Step 2: Click on the Generate button, the project will be downloaded on your local system.
Step 3: Unzip and extract the project.
Step 4: Import the project in your IDE such as Eclipse.
Select File -> Import -> Existing Maven Projects -> Browse -> Select the folder spring-boot-import-csv-file-app-> Finish.
Step 5: Configure the properties in application.properties file.
In this step, we will configure database related properties such as Spring DataSource, JPA, Hibernate.
application.properties
spring.datasource.url= jdbc:mysql://localhost:3306/csvFileApp
spring.datasource.username= your mysql database username
spring.datasource.password= database password

spring.jpa.properties.hibernate.dialect= org.hibernate.dialect.MySQL5InnoDBDialect

# Hibernate ddl auto (create, create-drop, validate, update)
spring.jpa.hibernate.ddl-auto= update
Data Source Properties
We are going to use MySQL as a data source in this application for storing the CSV File data.
- spring.datasource.url: It contains the URL to connect with the database or schema in the MySQL Workbench.
- spring.datasource.username: Username to access the database.
- spring.datasource.password: Password of the database.
JPA Properties
Since we are using a Hibernate as JPA, to perform all SQL or database operation, so all the important properties we have configured in this section.
- spring.jpa.hibernate.ddl-auto= update, Since we have set the value update, then Hibernate will automatically create a table in the database based on the Entity class.
Step 6: Create the Model or Entity Class
In this step, we will create a class that will be mapped with the MySQL database table.
DeveloperTutorial.java
package com.pixeltrice.springbootimportcsvfileapp;

import javax.persistence.Column;
import javax.persistence.Entity;
import javax.persistence.Id;
import javax.persistence.Table;


@Entity
@Table(name = "developer_tutorial")
public class DeveloperTutorial {

	  @Id
	  @Column(name = "id")
	  private long id;

	  @Column(name = "title")
	  private String title;

	  @Column(name = "description")
	  private String description;

	  @Column(name = "published")
	  private boolean published;

	  public DeveloperTutorial() {

	  }

	  public DeveloperTutorial(long id, String title, String  description, boolean published) {
	    this.id = id;
	    this.title = title;
	    this.description = description;
	    this.published = published;
	  }

	  public long getId() {
	    return id;
	  }

	  public void setId(long id) {
	    this.id = id;
	  }

	  public String getTitle() {
	    return title;
	  }

	  public void setTitle(String title) {
	    this.title = title;
	  }

	  public String getDescription() {
	    return description;
	  }

	  public void setDescription(String description) {
	    this.description = description;
	  }

	  public boolean isPublished() {
	    return published;
	  }

	  public void setPublished(boolean isPublished) {
	    this.published = isPublished;
	  }

	  @Override
	  public String toString() {
	    return "Tutorial [id=" + id + ", title=" + title + ", desc=" + description + ", published=" + published + "]";
	  }
	}
Above entity, the class will be mapped with a table named “developer_tutorial” in the MySQL Database. Since the class is tagged with @Entity annotation, so it is a Persistent Java Class.
@Table annotation indicates the database table name which mapped with the above Entity class. @Id annotation has used for representing the variable as a primary key in the table.
And the last annotation that is @Column is used to represent the name of the column which mapped with the mentioned variables or fields.
Step 7: Create a Repository Interface for DeveloperTutorial Entity Class
Here we will create the Repository which will communicate with our database and perform all types of CRUD Operation. In this step we will extend one predefined class named JpaRepository which provides all possible methods required to Create, Delete, Update, and fetch the data from the database table.
DeveloperTutorialRepository.java
package com.pixeltrice.springbootimportcsvfileapp;

import org.springframework.data.jpa.repository.JpaRepository;
import org.springframework.stereotype.Repository;

@Repository
public interface DeveloperTutorialRepository extends JpaRepository<DeveloperTutorial, Integer>{
}
JpaRepository<DeveloperTutorial, Integer>: In the angular bracket <> we have to mention the entity class name and the data type of the primary key. Since in our case, the Entity class name is DeveloperTutorial and the primary key is id having of Integer(long) type.
@Repository: This annotation indicates that the class or interface is completely dedicated to performing all sorts of CRUD Operations such as Create, update, read, or delete the data from the database.
Step 8: Create a Class to Read and Write the CSV File.
In this step, we are going to use one more dependency named Apache Commons CSV. It provides many inbuild classes such as CSVParser, CSVRecord, CSVFormat to read and write the data of CSV File.
Add the following dependency in pom.xml
<dependency>
    <groupId>org.apache.commons</groupId>
    <artifactId>commons-csv</artifactId>
    <version>1.8</version>
</dependency>
Now create a Helper class as shown below.
CSVHelper.java
package com.pixeltrice.springbootimportcsvfileapp;

import java.io.BufferedReader;
import java.io.ByteArrayInputStream;
import java.io.ByteArrayOutputStream;
import java.io.IOException;
import java.io.InputStream;
import java.io.InputStreamReader;
import java.io.PrintWriter;
import java.util.ArrayList;
import java.util.Arrays;
import java.util.List;

import org.apache.commons.csv.CSVFormat;
import org.apache.commons.csv.CSVParser;
import org.apache.commons.csv.CSVPrinter;
import org.apache.commons.csv.CSVRecord;
import org.apache.commons.csv.QuoteMode;
import org.springframework.web.multipart.MultipartFile;


public class CSVHelper {
  public static String TYPE = "text/csv";
  static String[] HEADERs = { "Id", "Title", "Description", "Published" };

  public static boolean hasCSVFormat(MultipartFile file) {
    if (TYPE.equals(file.getContentType())
    		|| file.getContentType().equals("application/vnd.ms-excel")) {
      return true;
    }

    return false;
  }

  public static List<DeveloperTutorial> csvToTutorials(InputStream is) {
    try (BufferedReader fileReader = new BufferedReader(new InputStreamReader(is, "UTF-8"));
        CSVParser csvParser = new CSVParser(fileReader,
            CSVFormat.DEFAULT.withFirstRecordAsHeader().withIgnoreHeaderCase().withTrim());) {

      List<DeveloperTutorial> developerTutorialList = new ArrayList<>();

      Iterable<CSVRecord> csvRecords = csvParser.getRecords();

      for (CSVRecord csvRecord : csvRecords) {
    	  DeveloperTutorial developerTutorial = new DeveloperTutorial(
              Long.parseLong(csvRecord.get("Id")),
              csvRecord.get("Title"),
              csvRecord.get("Description"),
              Boolean.parseBoolean(csvRecord.get("Published"))
            );

    	  developerTutorialList.add(developerTutorial);
      }

      return developerTutorialList;
    } catch (IOException e) {
      throw new RuntimeException("fail to parse CSV file: " + e.getMessage());
    }
  }

  public static ByteArrayInputStream tutorialsToCSV(List<DeveloperTutorial> developerTutorialList) {
    final CSVFormat format = CSVFormat.DEFAULT.withQuoteMode(QuoteMode.MINIMAL);

    try (ByteArrayOutputStream out = new ByteArrayOutputStream();
        CSVPrinter csvPrinter = new CSVPrinter(new PrintWriter(out), format);) {
      for (DeveloperTutorial developerTutorial : developerTutorialList) {
        List<String> data = Arrays.asList(
              String.valueOf(developerTutorial.getId()),
              developerTutorial.getTitle(),
              developerTutorial.getDescription(),
              String.valueOf(developerTutorial.isPublished())
            );

        csvPrinter.printRecord(data);
      }

      csvPrinter.flush();
      return new ByteArrayInputStream(out.toByteArray());
    } catch (IOException e) {
      throw new RuntimeException("fail to import data to CSV file: " + e.getMessage());
    }
  }
}
Explanation of each line of code.
- hasCSVFormat() Method
It is used to check the file format is CSV or not.
public static boolean hasCSVFormat(MultipartFile file) {

    if (!TYPE.equals(file.getContentType())) {
      return false;
    }

    return true;
  }
2. csvToTutorials() Method
This method is completely used for reading the CSV File data. Below I have summaries each line of code used in this method.
To Read the CSV File.
- Create a BufferedReader Object from InputStream.
BufferedReader fileReader = new BufferedReader(new InputStreamReader(is, "UTF-8"));- Next, we are creating a CSVParser Object from BufferedReader and InputStream.
 CSVParser csvParser = new CSVParser(fileReader,
            CSVFormat.DEFAULT.withFirstRecordAsHeader().withIgnoreHeaderCase().withTrim());) {
- With the help of CSVParser object reference, we are calling a predefined method named getRecords(), which returns the content present in the CSV File in the form of Record.
Iterable<CSVRecord> csvRecords = csvParser.getRecords();- Then we are iterating over each record and with help of the get() method, we are getting the value of each field.
  for (CSVRecord csvRecord : csvRecords) {
    	  DeveloperTutorial developerTutorial = new DeveloperTutorial(
              Long.parseLong(csvRecord.get("Id")),
              csvRecord.get("Title"),
              csvRecord.get("Description"),
              Boolean.parseBoolean(csvRecord.get("Published"))
            );

    	  developerTutorialList.add(developerTutorial);
      }
3. tutorialsToCSV() Method
This method is used to write the data in the CSV file from the MySQL database table.
To write the CSV File
- Create an Object of ByteArrayInputStream.
ByteArrayOutputStream out = new ByteArrayOutputStream();- Creating an CSVPrinter Object to print the value in CSV File.
CSVPrinter csvPrinter = new CSVPrinter(new PrintWriter(out), format);) {- Next, we are iterating over the list of DeveloperTutorial objects and storing each and every value in the form of a String List, and then, we are calling the csvPrinter.printRecord() method.
for (DeveloperTutorial developerTutorial : developerTutorialList) {
        List<String> data = Arrays.asList(
              String.valueOf(developerTutorial.getId()),
              developerTutorial.getTitle(),
              developerTutorial.getDescription(),
              String.valueOf(developerTutorial.isPublished())
            );

        csvPrinter.printRecord(data);
      }
In the very last step, we are flushing out all the characters or stream data into the final CSV File with the use of the below method.
csvPrinter.flush();Step 9: Create CSV File Service Class.
In this class we are going to define the three method as follows.
- save(MultipartFile file): To save the CSV File data to the database.
- load(): It will read the data from the database and return in the form of ByteArrayInputStream.
- getAllTutorials(): This method will also read the data from the database and return the List of developer tutorials. List<DeveloperTutorial>.
CSVService.java
package com.pixeltrice.springbootimportcsvfileapp;

import java.io.ByteArrayInputStream;
import java.io.IOException;
import java.util.List;

import org.springframework.beans.factory.annotation.Autowired;
import org.springframework.stereotype.Service;
import org.springframework.web.multipart.MultipartFile;

@Service
public class CSVService {
  @Autowired
  DeveloperTutorialRepository repository;

  public void save(MultipartFile file) {
    try {
      List<DeveloperTutorial> tutorials = CSVHelper.csvToTutorials(file.getInputStream());
      repository.saveAll(tutorials);
    } catch (IOException e) {
      throw new RuntimeException("fail to store csv data: " + e.getMessage());
    }
  }

  public ByteArrayInputStream load() {
    List<DeveloperTutorial> tutorials = repository.findAll();

    ByteArrayInputStream in = CSVHelper.tutorialsToCSV(tutorials);
    return in;
  }

  public List<DeveloperTutorial> getAllTutorials() {
    return repository.findAll();
  }
}
Step 10: Create a Class for Response Message.
In this step, we will create a class to define the format of the Response message so that whenever any API or endpoint gets a call, it should return the Response in the proper format. This class will use in the next step while creating a controller class.
ResponseMessage.java
package com.pixeltrice.springbootimportcsvfileapp;

public class ResponseMessage {

	private String message;
	private String fileDownloadUri;


	  public ResponseMessage(String message, String fileDownloadUri) {
	    this.message = message;
	    this.fileDownloadUri = fileDownloadUri;
	  }

	  public String getMessage() {
	    return message;
	  }

	  public void setMessage(String message) {
	    this.message = message;
	  }

	public String getFileDownloadUri() {
		return fileDownloadUri;
	}

	public void setFileDownloadUri(String fileDownloadUri) {
		this.fileDownloadUri = fileDownloadUri;
	}

}
Step 11: Create a Controller class.
In this steps where we will define all the endpoints or API to upload, download or read, write the CSV File data.
CSVController.java
package com.pixeltrice.springbootimportcsvfileapp;

import java.util.List;

import org.springframework.beans.factory.annotation.Autowired;
import org.springframework.core.io.InputStreamResource;
import org.springframework.core.io.Resource;
import org.springframework.http.HttpHeaders;
import org.springframework.http.HttpStatus;
import org.springframework.http.MediaType;
import org.springframework.http.ResponseEntity;
import org.springframework.stereotype.Controller;
import org.springframework.web.bind.annotation.CrossOrigin;
import org.springframework.web.bind.annotation.GetMapping;
import org.springframework.web.bind.annotation.PathVariable;
import org.springframework.web.bind.annotation.PostMapping;
import org.springframework.web.bind.annotation.RequestMapping;
import org.springframework.web.bind.annotation.RequestParam;
import org.springframework.web.multipart.MultipartFile;
import org.springframework.web.servlet.support.ServletUriComponentsBuilder;

@CrossOrigin("http://localhost:8080")
@Controller
@RequestMapping("/api/csv")
public class CSVController {

  @Autowired
  CSVService fileService;

  @PostMapping("/upload")
  public ResponseEntity<ResponseMessage> uploadFile(@RequestParam("file") MultipartFile file) {
    String message = "";

    if (CSVHelper.hasCSVFormat(file)) {
      try {
        fileService.save(file);

        message = "Uploaded the file successfully: " + file.getOriginalFilename();

        String fileDownloadUri = ServletUriComponentsBuilder.fromCurrentContextPath()
                .path("/api/csv/download/")
                .path(file.getOriginalFilename())
                .toUriString();

        return ResponseEntity.status(HttpStatus.OK).body(new ResponseMessage(message,fileDownloadUri));
      } catch (Exception e) {
        message = "Could not upload the file: " + file.getOriginalFilename() + "!";
        return ResponseEntity.status(HttpStatus.EXPECTATION_FAILED).body(new ResponseMessage(message,""));
      }
    }

    message = "Please upload a csv file!";
    return ResponseEntity.status(HttpStatus.BAD_REQUEST).body(new ResponseMessage(message,""));
  }

  @GetMapping("/tutorials")
  public ResponseEntity<List<DeveloperTutorial>> getAllTutorials() {
    try {
      List<DeveloperTutorial> tutorials = fileService.getAllTutorials();

      if (tutorials.isEmpty()) {
        return new ResponseEntity<>(HttpStatus.NO_CONTENT);
      }

      return new ResponseEntity<>(tutorials, HttpStatus.OK);
    } catch (Exception e) {
      return new ResponseEntity<>(null, HttpStatus.INTERNAL_SERVER_ERROR);
    }
  }

  @GetMapping("/download/{fileName:.+}")
  public ResponseEntity<Resource> downloadFile(@PathVariable String fileName) {
    InputStreamResource file = new InputStreamResource(fileService.load());

    return ResponseEntity.ok()
        .header(HttpHeaders.CONTENT_DISPOSITION, "attachment; filename=" + fileName)
        .contentType(MediaType.parseMediaType("application/csv"))
        .body(file);
  }
}
Explanation of each line of code in the above class.
Annotation Used.
- @CrossOrigin: This annotation is used to configure the origins which are allowed to call our API.
- @Controller: To make the class as Controller.
- @RequestMapping: This annotation is used to mapped the specific class methods when a certain API gets a call from the client.
- @GetMapping: To handle the HTTP GET Request.
- @PostMapping: It is used to handle the HTTP POST Request.
Methods used in controller class.
There is a total of 3 methods define in the controller class which mapped with three different APIs.
- uploadFile(): Used to upload the File.
- getAllTutorials(): To get all the list of developer tutorials from the database.
- downloadFile(): In order to download the CSV file.
Step 12: Configure the Maximum size of CSV File to be upload.
In this step, we will configure the maximum size of the file in application.properties.
spring.servlet.multipart.max-file-size=2MB
spring.servlet.multipart.max-request-size=2MB
Step 13: Create class to handle the File Upload Exception.
In this class, we will define the method which is responsible to handle the exception that arises when someone tries to upload the file of size more than as configured value in the application.properties file.
FileUploadExceptionAdvice.java
package com.pixeltrice.springbootimportcsvfileapp;

import org.springframework.http.HttpStatus;
import org.springframework.http.ResponseEntity;
import org.springframework.web.bind.annotation.ControllerAdvice;
import org.springframework.web.bind.annotation.ExceptionHandler;
import org.springframework.web.multipart.MaxUploadSizeExceededException;
import org.springframework.web.servlet.mvc.method.annotation.ResponseEntityExceptionHandler;

@ControllerAdvice
public class FileUploadExceptionAdvice extends ResponseEntityExceptionHandler {

  @SuppressWarnings("rawtypes")
@ExceptionHandler(MaxUploadSizeExceededException.class)
  public ResponseEntity handleMaxSizeException(MaxUploadSizeExceededException exc) {
    return ResponseEntity.status(HttpStatus.EXPECTATION_FAILED).body(new ResponseMessage("File too large!",""));
  }
}
Alright, all the coding part has been completed and now we are good to Run the Application.
But before running makes sure that the following files have exactly the same as shown below.
pom.xml
<?xml version="1.0" encoding="UTF-8"?>
<project xmlns="http://maven.apache.org/POM/4.0.0" xmlns:xsi="http://www.w3.org/2001/XMLSchema-instance"
	xsi:schemaLocation="http://maven.apache.org/POM/4.0.0 https://maven.apache.org/xsd/maven-4.0.0.xsd">
	<modelVersion>4.0.0</modelVersion>
	<parent>
		<groupId>org.springframework.boot</groupId>
		<artifactId>spring-boot-starter-parent</artifactId>
		<version>2.3.3.RELEASE</version>
		<relativePath/> <!-- lookup parent from repository -->
	</parent>
	<groupId>com.pixeltrice</groupId>
	<artifactId>spring-boot-import-csv-file-app</artifactId>
	<version>0.0.1-SNAPSHOT</version>
	<name>spring-boot-import-csv-file-app</name>
	<description>Demo project for Spring Boot</description>

	<properties>
		<java.version>11</java.version>
	</properties>

	<dependencies>
		<dependency>
			<groupId>org.springframework.boot</groupId>
			<artifactId>spring-boot-starter-data-jpa</artifactId>
		</dependency>
		<dependency>
			<groupId>org.springframework.boot</groupId>
			<artifactId>spring-boot-starter-web</artifactId>
		</dependency>

		<dependency>
			<groupId>mysql</groupId>
			<artifactId>mysql-connector-java</artifactId>
			<scope>runtime</scope>
		</dependency>
		<!-- https://mvnrepository.com/artifact/org.apache.commons/commons-csv -->
		<dependency>
		    <groupId>org.apache.commons</groupId>
		    <artifactId>commons-csv</artifactId>
		    <version>1.8</version>
		</dependency>

		<dependency>
			<groupId>org.springframework.boot</groupId>
			<artifactId>spring-boot-starter-test</artifactId>
			<scope>test</scope>
			<exclusions>
				<exclusion>
					<groupId>org.junit.vintage</groupId>
					<artifactId>junit-vintage-engine</artifactId>
				</exclusion>
			</exclusions>
		</dependency>
	</dependencies>

	<build>
		<plugins>
			<plugin>
				<groupId>org.springframework.boot</groupId>
				<artifactId>spring-boot-maven-plugin</artifactId>
			</plugin>
		</plugins>
	</build>

</project>
And the application.properties
spring.datasource.url= jdbc:mysql://localhost:3306/csvFileApp?useSSL=false
spring.datasource.username= your mysql database username
spring.datasource.password= database password

spring.jpa.properties.hibernate.dialect= org.hibernate.dialect.MySQL5InnoDBDialect

# Hibernate ddl auto (create, create-drop, validate, update)
spring.jpa.hibernate.ddl-auto= update

#Configure the file size to be uploaded
spring.servlet.multipart.max-file-size=2MB
spring.servlet.multipart.max-request-size=2MB
Step 14: Run the Application
After running the application please go to the POSTMAN and upload the .csv file by calling the localhost:8080/api/csv/upload.
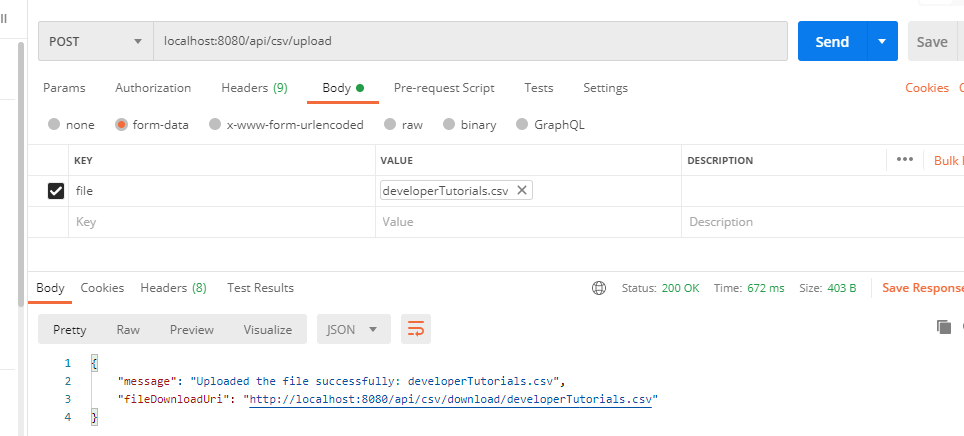
Go to the MySQL database and verify the data has been stored on the table from the CSV file.
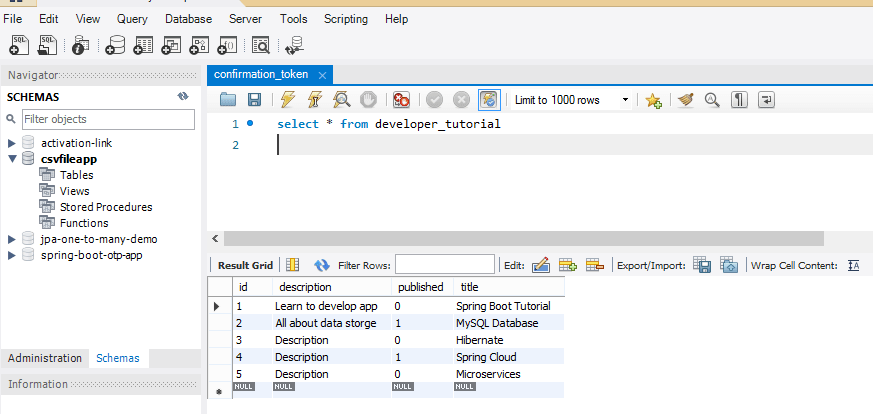
Now if you want to download all the stored data from the MySQL Database in the form of a .csv file, then please call the following API from POSTMAN localhost:8080/api/csv/download/{fileName:.+}.
{fileName:.+}: Give whatever name you want for the file to be saved on your local system.
For example consider, data.csv, then we need to call API localhost:8080/api/csv/download/data.csv, and please choose the send and download button and send GET Request from POSTMAN as shown in the figure.

If you want the data in the form of a list then please call the API localhost:8080/api/csv/tutorials, and send the GET Request, you get all the data in the form of a list.
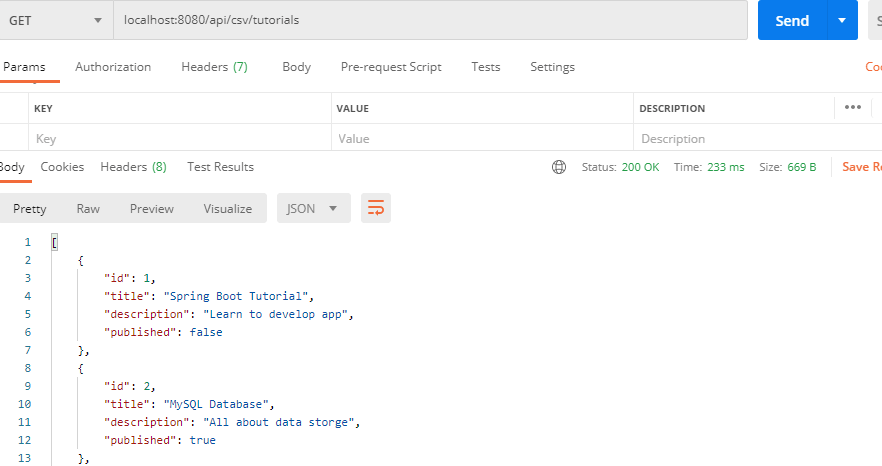
Alright, our application is fully working, Now If you are interested then please follow a few more steps for Frond End Design.
Step 15: Create a Frond End for our application.
1. Create a index.html in the path src/main/resources/static.
index.html
<!DOCTYPE html>
<html>
    <head>
        <meta name="viewport" content="width=device-width, initial-scale=1.0, minimum-scale=1.0">
        <title>Spring Boot CSV file Application</title>
        <link rel="stylesheet" href="/css/main.css" />
    </head>
    <body>

        <div class="upload-container">
            <div class="upload-header">
                <h2>Import the CSV file into Mysql Database using Spring Boot Application</h2>
            </div>
            <div class="upload-content">
                <div class="single-upload">
                    <h3>Upload the CSV File </h3>
                    <form id="singleUploadForm" name="singleUploadForm">
                        <input id="singleFileUploadInput" type="file" name="file" class="file-input" required />
                        <button type="submit" class="primary submit-btn">Submit</button>
                    </form>
                    <div class="upload-response">
                        <div id="singleFileUploadError"></div>
                        <div id="singleFileUploadSuccess"></div>
                    </div>
                </div>

            </div>
        </div>
        <script src="/js/main.js" ></script>
    </body>
</html>
2. Add the main.js in the path src/main/resources/static/js
In this step, we will add the javascript code required for uploading and downloading the CSV files.
main.js
'use strict';

var singleUploadForm = document.querySelector('#singleUploadForm');
var singleFileUploadInput = document.querySelector('#singleFileUploadInput');
var singleFileUploadError = document.querySelector('#singleFileUploadError');
var singleFileUploadSuccess = document.querySelector('#singleFileUploadSuccess');


function uploadSingleFile(file) {
    var formData = new FormData();
    formData.append("file", file);

    var xhr = new XMLHttpRequest();
    xhr.open("POST", "/api/csv/upload");

    xhr.onload = function() {
        console.log(xhr.responseText);
        var response = JSON.parse(xhr.responseText);
        if(xhr.status == 200) {
            singleFileUploadError.style.display = "none";
            singleFileUploadSuccess.innerHTML = "<p>File Uploaded Successfully.</p><p>DownloadUrl : <a href='" + response.fileDownloadUri + "' target='_blank'>" + response.fileDownloadUri + "</a></p>";
            singleFileUploadSuccess.style.display = "block";
        } else {
            singleFileUploadSuccess.style.display = "none";
            singleFileUploadError.innerHTML = "<p>"+(response && response.message)+"<p>" || "Some Error Occurred";
            singleFileUploadSuccess.style.display = "block";

        }
    }

    xhr.send(formData);
}

singleUploadForm.addEventListener('submit', function(event){
    var files = singleFileUploadInput.files;
    if(files.length === 0) {
        singleFileUploadError.innerHTML = "Please select a file";
        singleFileUploadError.style.display = "block";
    }
    uploadSingleFile(files[0]);
    event.preventDefault();
}, true);
3. Adding the main.css in the path src/main/resources/static/css
main.css
* {
    -webkit-box-sizing: border-box;
    -moz-box-sizing: border-box;
    box-sizing: border-box;
}

body {
    margin: 0;
    padding: 0;
    font-weight: 400;
    font-family: "Helvetica Neue", Helvetica, Arial, sans-serif;
    font-size: 1rem;
    line-height: 1.58;
    color: #333;
    background-color: #f4f4f4;
}

body:before {
    height: 50%;
    width: 100%;
    position: absolute;
    top: 0;
    left: 0;
    background: #ed9af5;
    content: "";
    z-index: 0;
}

.clearfix:after {
    display: block;
    content: "";
    clear: both;
}


h1, h2, h3, h4, h5, h6 {
    margin-top: 20px;
    margin-bottom: 20px;
}

h1 {
    font-size: 1.7em;
}

a {
    color: #128ff2;
}

button {
    box-shadow: none;
    border: 1px solid transparent;
    font-size: 14px;
    outline: none;
    line-height: 100%;
    white-space: nowrap;
    vertical-align: middle;
    padding: 0.6rem 1rem;
    border-radius: 2px;
    transition: all 0.2s ease-in-out;
    cursor: pointer;
    min-height: 38px;
}

button.primary {
    background-color: #ed9af5;
    box-shadow: 0 2px 2px 0 rgba(0, 0, 0, 0.12);
    color: #fff;
}

input {
    font-size: 1rem;
}

input[type="file"] {
    border: 1px solid #128ff2;
    padding: 6px;
    max-width: 100%;
}

.file-input {
    width: 100%;
}

.submit-btn {
    display: block;
    margin-top: 15px;
    min-width: 100px;
}

@media screen and (min-width: 500px) {
    .file-input {
        width: calc(100% - 115px);
    }

    .submit-btn {
        display: inline-block;
        margin-top: 0;
        margin-left: 10px;
    }
}

.upload-container {
      max-width: 600px;
      margin-left: auto;
      margin-right: auto;
      background-color: #fff;
      box-shadow: 0 1px 11px rgba(0, 0, 0, 0.4);
      margin-top: 60px;
      min-height: 400px;
      position: relative;
      padding: 20px;
}

.upload-header {
    border-bottom: 1px solid #ececec;
}

.upload-header h2 {
    font-weight: 500;
}

.single-upload {
    padding-bottom: 20px;
    margin-bottom: 20px;
    border-bottom: 1px solid #e8e8e8;
}

.upload-response {
    overflow-x: hidden;
    word-break: break-all;
}
Step 16: Run the Application.
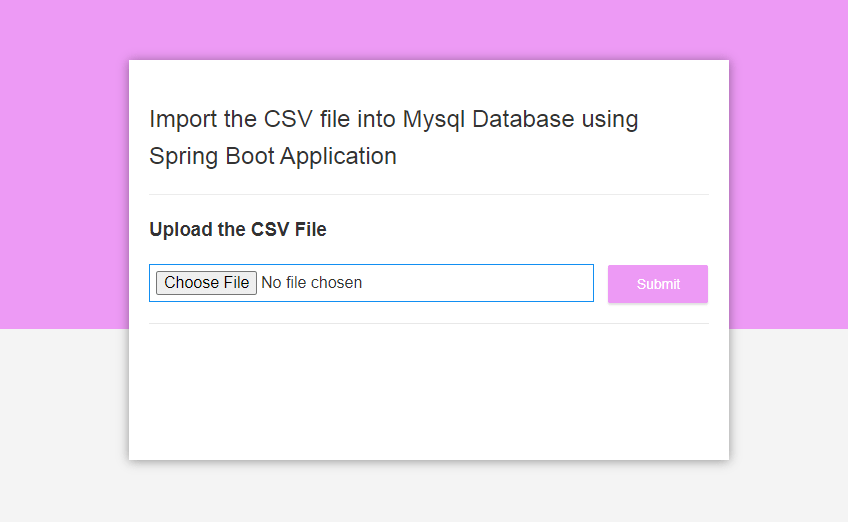
Go to the localhost:8080 in your browser, you will get the screen as shown below. And Perform uploads download from UI.
Summary
In this article, we have learned and built the application which can read the data stored in the CSV file and store it in the MySQL Database, and finally, we also implemented the feature to download the data in the form of a CSV file from MySQL Database. If you have any queries or doubt then please feel free to ask in the comment section.
You might also like this article.
- Build Spring Boot Chat Application from scratch
- Payment Integration With Paytm in Spring Boot Application
- Send OTP(One Time Password) Using Spring Boot Application for Authentication
- Make a Voice Call from Spring Boot Application to Mobile Phone
- How to send email using Spring Boot Application
- Spring Boot Security using OAuth2 with JWT