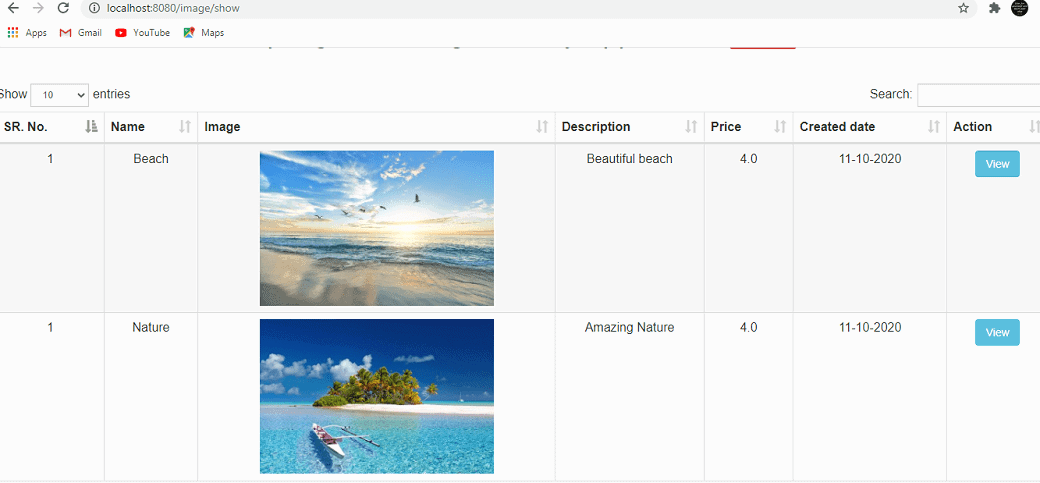
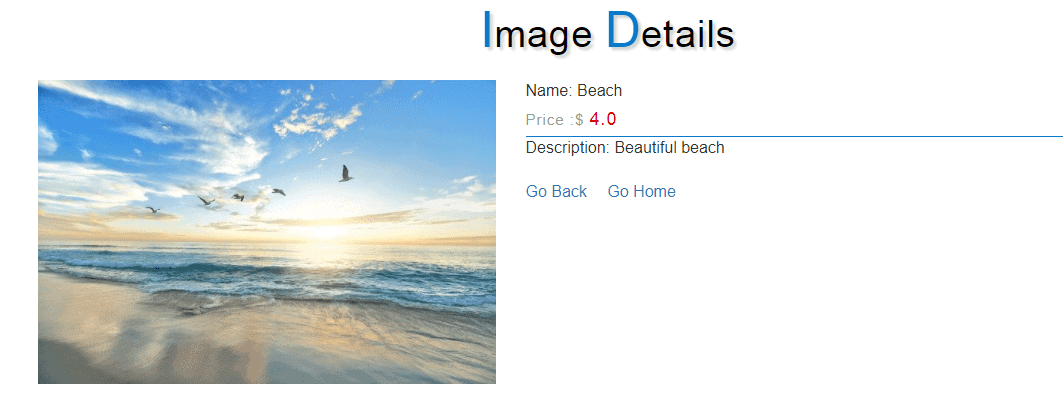
In this article, we will build the image gallery application from scratch with the use of the Spring Boot framework where users can list their images.
Following are the features we are going to implement in the application.
- The users can list their image along with the details such as,
- Name
- Description
- Image
- Price. (if they want to sell).
- Anyone can view the listed images along with all the details.
Note: We will use the MySQL Database to store all the image details.
Final Application


Note: Video Tutorial is available in the bottom section.
You can find the source code in the bottom section of this article.
Please follow the below mention steps strictly to build the application from scratch.
Step 1: Create a Project from Spring Initializr.
- Go to the Spring Initializr.
- Enter a Group name, com.pixeltrice.
- Mention the Artifact Id, spring-boot-image-gallery-app
- Add the following dependencies.
- Spring Web
- Spring Data JPA
- MySQL Driver
- Thymeleaf
Step 2: Press on the Generate button, the project will be downloaded on your local system.
Step 3: Now Unzip and extract the project to the local system.
Step 4: After that import the project in your IDE such as Eclipse.
Select File -> Import -> Existing Maven Projects -> Browse -> Select the folder spring-boot-image-gallery-app-> Finish.
Step 5: Configure the properties in the application.properties
application.properties
# Set here configurations for the database connection
spring.datasource.url=jdbc:mysql://localhost:3306/imageGalleryApp?autoReconnect=true&useSSL=false
spring.datasource.driver-class-name=com.mysql.jdbc.Driver
spring.datasource.username=root
spring.datasource.password=your MySQL Password

# Specify the DBMS
spring.jpa.database = MYSQL
# Show or not log for each sql query
spring.jpa.show-sql = true
#create-drop| update | validate | none
spring.jpa.hibernate.ddl-auto = update

# SQL dialect for generating optimized queries
spring.jpa.properties.hibernate.dialect = org.hibernate.dialect.MySQL5Dialect

uploadDir=/resources

#Enable multipart uploads
spring.servlet.multipart.enabled=true
# Threshold after which files are written to disk.
spring.servlet.multipart.file-size-threshold=2KB
# Max file size.
spring.servlet.multipart.max-file-size=200MB
# Max Request Size
spring.servlet.multipart.max-request-size=215MB
All the properties are self explanatory, you easily understand by looking it.
Step 6: Create an entity class for the image.
In this step, we will define the entity class which will be mapped with a table present in the database.
ImageGallery.java
package com.pixeltrice.springbootimagegalleryapp.entity;

import java.util.Arrays;
import java.util.Date;
import javax.persistence.Column;
import javax.persistence.Entity;
import javax.persistence.GeneratedValue;
import javax.persistence.GenerationType;
import javax.persistence.Id;
import javax.persistence.Lob;
import javax.persistence.Table;
import javax.persistence.Temporal;
import javax.persistence.TemporalType;

@Entity
@Table(name = "image_gallery")
public class ImageGallery {

	@Id @GeneratedValue(strategy = GenerationType.IDENTITY)
	@Column(name = "id", nullable = false, unique = true)
	private Long id;

	@Column(name = "name", nullable = false)
	private String name;

	@Column(name = "description", nullable = false)
	private String description;

	@Column(name = "price",nullable = false, precision = 10, scale = 2)
    private double price;

	@Lob
    @Column(name = "Image", length = Integer.MAX_VALUE, nullable = true)
    private byte[] image;

    @Temporal(TemporalType.TIMESTAMP)
    @Column(name = "create_date", nullable = false)
    private Date createDate;

	public ImageGallery() {}

	public Long getId() {
		return id;
	}

	public void setId(Long id) {
		this.id = id;
	}

		public String getName() {
		return name;
	}

	public void setName(String name) {
		this.name = name;
	}

	public String getDescription() {
		return description;
	}

	public void setDescription(String description) {
		this.description = description;
	}

	public double getPrice() {
		return price;
	}

	public void setPrice(double price) {
		this.price = price;
	}

	public byte[] getImage() {
		return image;
	}

	public void setImage(byte[] image) {
		this.image = image;
	}

	public Date getCreateDate() {
		return createDate;
	}

	public void setCreateDate(Date createDate) {
		this.createDate = createDate;
	}

	@Override
	public String toString() {
		return "Product [id=" + id + ", name=" + name + ", description=" + description + ", price=" + price + ", image="
				+ Arrays.toString(image) + ", createDate=" + createDate + "]";
	}

}
Above entity, the class will be mapped with a table named “image_gallery” in the MySQL Database. Since the class is tagged with @Entity annotation, so it is a Persistent Java Class.
@Table annotation indicates the database table name which mapped with the above Entity class. @Id annotation has used for representing the variable as a primary key in the table.
@Column annotation is used to represent the name of the column which mapped with the mentioned variables or fields.
@Lob annotation is used for storing large objects to the database such as byte array or large string. In our case, we are storing the image in the form of a byte array.
This annotation used to specify that the field which tagged or annotated with Lob, should be represented in the form of BLOB(binary large object) datatype in the database table.
Step 7: Create a Repository Interface for ImageGallery Entity Class
Here we will create the Repository which will communicate with our database and perform all types of CRUD Operation. In this step we will extend one predefined class named JpaRepository which provides all possible methods required to Create, Delete, Update, and fetch the data from the database table.
ImageGalleryRepository.java
package com.pixeltrice.springbootimagegalleryapp.repository;

import org.springframework.data.jpa.repository.JpaRepository;
import org.springframework.stereotype.Repository;

import com.pixeltrice.springbootimagegalleryapp.entity.ImageGallery;


@Repository
public interface ImageGalleryRepository extends JpaRepository<ImageGallery, Long>{

}
JpaRepository<ImageGallery, Long>: In the angular bracket <> we have to mention the entity class name and the data type of the primary key. Since in our case, the Entity class name is ImageGallery and the primary key is id having of Long type.
@Repository: This annotation indicates that the class or interface is completely dedicated to performing all sorts of CRUD Operations such as Create, update, read, or delete the data from the database.
Step 8: Create a ImageGallery Service class
ImageGalleryService.java
package com.pixeltrice.springbootimagegalleryapp.service;

import java.util.List;
import java.util.Optional;

import org.springframework.beans.factory.annotation.Autowired;
import org.springframework.stereotype.Service;

import com.pixeltrice.springbootimagegalleryapp.entity.ImageGallery;
import com.pixeltrice.springbootimagegalleryapp.repository.ImageGalleryRepository;


@Service
public class ImageGalleryService {

	@Autowired
	private ImageGalleryRepository imageGalleryRepository;

	public void saveImage(ImageGallery imageGallery) {
		imageGalleryRepository.save(imageGallery);
	}

	public List<ImageGallery> getAllActiveImages() {
		return imageGalleryRepository.findAll();
	}

	public Optional<ImageGallery> getImageById(Long id) {
		return imageGalleryRepository.findById(id);
	}
}
Step 9: Create a Controller Class
In the controller class, we will create the APIs, to store and fetch the images from the MySQL Database.
ImageGalleryController.java
package com.pixeltrice.springbootimagegalleryapp.controller;

import java.io.BufferedOutputStream;
import java.io.File;
import java.io.FileOutputStream;
import java.io.IOException;
import java.nio.file.Paths;
import java.util.Date;
import java.util.List;
import java.util.Optional;

import javax.servlet.ServletException;
import javax.servlet.http.HttpServletRequest;
import javax.servlet.http.HttpServletResponse;

import org.slf4j.Logger;
import org.slf4j.LoggerFactory;
import org.springframework.beans.factory.annotation.Autowired;
import org.springframework.beans.factory.annotation.Value;
import org.springframework.http.HttpStatus;
import org.springframework.http.ResponseEntity;
import org.springframework.stereotype.Controller;
import org.springframework.ui.Model;
import org.springframework.web.bind.annotation.GetMapping;
import org.springframework.web.bind.annotation.PathVariable;
import org.springframework.web.bind.annotation.PostMapping;
import org.springframework.web.bind.annotation.RequestParam;
import org.springframework.web.bind.annotation.ResponseBody;
import org.springframework.web.multipart.MultipartFile;

import com.pixeltrice.springbootimagegalleryapp.entity.ImageGallery;
import com.pixeltrice.springbootimagegalleryapp.service.ImageGalleryService;


@Controller
public class ImageGalleryController {

	@Value("${uploadDir}")
	private String uploadFolder;

	@Autowired
	private ImageGalleryService imageGalleryService;

	private final Logger log = LoggerFactory.getLogger(this.getClass());

	@GetMapping(value = {"/", "/home"})
	public String addProductPage() {
		return "index";
	}

	@PostMapping("/image/saveImageDetails")
	public @ResponseBody ResponseEntity<?> createProduct(@RequestParam("name") String name,
			@RequestParam("price") double price, @RequestParam("description") String description, Model model, HttpServletRequest request
			,final @RequestParam("image") MultipartFile file) {
		try {
			//String uploadDirectory = System.getProperty("user.dir") + uploadFolder;
			String uploadDirectory = request.getServletContext().getRealPath(uploadFolder);
			log.info("uploadDirectory:: " + uploadDirectory);
			String fileName = file.getOriginalFilename();
			String filePath = Paths.get(uploadDirectory, fileName).toString();
			log.info("FileName: " + file.getOriginalFilename());
			if (fileName == null || fileName.contains("..")) {
				model.addAttribute("invalid", "Sorry! Filename contains invalid path sequence \" + fileName");
				return new ResponseEntity<>("Sorry! Filename contains invalid path sequence " + fileName, HttpStatus.BAD_REQUEST);
			}
			String[] names = name.split(",");
			String[] descriptions = description.split(",");
			Date createDate = new Date();
			log.info("Name: " + names[0]+" "+filePath);
			log.info("description: " + descriptions[0]);
			log.info("price: " + price);
			try {
				File dir = new File(uploadDirectory);
				if (!dir.exists()) {
					log.info("Folder Created");
					dir.mkdirs();
				}
				// Save the file locally
				BufferedOutputStream stream = new BufferedOutputStream(new FileOutputStream(new File(filePath)));
				stream.write(file.getBytes());
				stream.close();
			} catch (Exception e) {
				log.info("in catch");
				e.printStackTrace();
			}
			byte[] imageData = file.getBytes();
			ImageGallery imageGallery = new ImageGallery();
			imageGallery.setName(names[0]);
			imageGallery.setImage(imageData);
			imageGallery.setPrice(price);
			imageGallery.setDescription(descriptions[0]);
			imageGallery.setCreateDate(createDate);
			imageGalleryService.saveImage(imageGallery);
			log.info("HttpStatus===" + new ResponseEntity<>(HttpStatus.OK));
			return new ResponseEntity<>("Product Saved With File - " + fileName, HttpStatus.OK);
		} catch (Exception e) {
			e.printStackTrace();
			log.info("Exception: " + e);
			return new ResponseEntity<>(HttpStatus.BAD_REQUEST);
		}
	}

	@GetMapping("/image/display/{id}")
	@ResponseBody
	void showImage(@PathVariable("id") Long id, HttpServletResponse response, Optional<ImageGallery> imageGallery)
			throws ServletException, IOException {
		log.info("Id :: " + id);
		imageGallery = imageGalleryService.getImageById(id);
		response.setContentType("image/jpeg, image/jpg, image/png, image/gif");
		response.getOutputStream().write(imageGallery.get().getImage());
		response.getOutputStream().close();
	}

	@GetMapping("/image/imageDetails")
	String showProductDetails(@RequestParam("id") Long id, Optional<ImageGallery> imageGallery, Model model) {
		try {
			log.info("Id :: " + id);
			if (id != 0) {
				imageGallery = imageGalleryService.getImageById(id);

				log.info("products :: " + imageGallery);
				if (imageGallery.isPresent()) {
					model.addAttribute("id", imageGallery.get().getId());
					model.addAttribute("description", imageGallery.get().getDescription());
					model.addAttribute("name", imageGallery.get().getName());
					model.addAttribute("price", imageGallery.get().getPrice());
					return "imagedetails";
				}
				return "redirect:/home";
			}
		return "redirect:/home";
		} catch (Exception e) {
			e.printStackTrace();
			return "redirect:/home";
		}
	}

	@GetMapping("/image/show")
	String show(Model map) {
		List<ImageGallery> images = imageGalleryService.getAllActiveImages();
		map.addAttribute("images", images);
		return "images";
	}
}
Explanation of each API present in Controller class.
- @GetMapping(value = {“/”, “/home”}): Whenever a request comes to this API it will return the index, Since we have implemented the thymeleaf in our application, so it will return the index.html page.
2. @PostMapping(“/image/saveImageDetails”): It is used to store the new image details into the MySQL Database.
request.getServletContext().getRealPath(uploadFolder): As you can see we already initialized the variable uploadFolder by assigning the value /resources from application.properties file.
And we are passing as an argument to getRealPath(), so it will return the complete path where you have created a workspace in your local system. Hence for me
file.getOriginalFilename(): It will return the actual name of the product image such as image.png, it depends on the name of the product you have uploaded.
Paths.get(uploadDirectory, fileName).toString(): It will return the exact location on your system where the uploaded image has been saved.
After that, we have converted the image into the byte array and stored all the image related details such as name, description, images, etc. into the MySQL Database.
As you can see we store the image in the database table in the byte[] form, that why in the entity class we have to use the annotation @Lob.
3. @GetMapping(“/image/display/{id}”): This API is used to fetch the byte[] form of the particular image from the database and convert it into the jpeg, png, jpg, or gif format to display in the browser.
4. @GetMapping(“/image/imageDetails”): It fetches the image details from the database based on the image id and displays in the imagedetails.html
5. @GetMapping(“/image/show”): This one is the last API in the controller class which is used to show the list of products along with their details in the images.html page.
Step 10: Create an HTML Pages
In the last step, we saw that there are three HTML pages required for our application. Let’s create it.
Note: Make sure you should create all HTML Pages inside the \src\main\resources\templates
index.html
<!DOCTYPE html>
<html lang="en">
<head>
  <title>PixelTrice</title>
  <meta charset="utf-8">
  <meta name="viewport" content="width=device-width, initial-scale=1">
  <link rel="stylesheet" href="https://maxcdn.bootstrapcdn.com/bootstrap/3.4.1/css/bootstrap.min.css">
  <link rel="stylesheet" href="/css/style.css">
  <script src="https://ajax.googleapis.com/ajax/libs/jquery/3.5.1/jquery.min.js"></script>
  <script src="https://maxcdn.bootstrapcdn.com/bootstrap/3.4.1/js/bootstrap.min.js"></script>
</head>
<body>
<br><br>
<h1 class="text-center">Spring Boot Image Gallery Application</h1><br><br>
<div class="contact py-sm-5 py-4">
		<div class="container py-xl-4 py-lg-2">
		<!-- form -->
		<form id="form">
				<div class="contact-grids1 w3agile-6">
					<div class="row">
						<div class="col-md-6 col-sm-6 contact-form1 form-group">
							<label class="col-form-label">Name</label>
							<input type="text" class="form-control" placeholder="Product Name" id="name" name="name" required="required">
							<p id="error_name"></p>
						</div>
						<div class="col-md-6 col-sm-6 contact-form1 form-group">
							<label class="col-form-label">Description</label>
							<textarea class="form-control" placeholder="Product Description" id="description" rows="3" cols="45" name="description" required="required"></textarea>
							<p id="error_description"></p>
						</div>
						<div class="col-md-6 col-sm-6 contact-form1 form-group">
							<label class="col-form-label">Image</label>
							<input type="file" class="form-control" placeholder="" name="image" id="image" required="required">
							<p id="error_file"></p>
						</div>
						<div class="col-md-6 col-sm-6 contact-form1 form-group">
							<label class="col-form-label">Price</label>
							<input type="text" class="form-control" placeholder="Price" name="price" id="price" required="required">
							<p id="error_price"></p>
						</div>
					</div>

						<div class="right-w3l col-md-6">
							<input type="button" id="submit" class="btn btn-primary form-control" value="Submit">
							<br><br>
						</div>
						<a href="/image/show" style="float:left;" class="btn btn-success text-right">Show All</a>
				</div>
				<br>
				<div id="success" class="text-center" style="color:green;"></div>
				<div id="error" class="text-center" style="color:red;"></div>
			</form>
		</div>
	</div>
<p class="text-center">
  	<img src="/images/loader.gif" alt="loader" style="width: 150px;height: 120px;" id="loader">
</p>
	<script src="/js/product.js"></script>
</body>
</html>
images.html
<!DOCTYPE html>
<html lang="en" xmlns:th="http://www.thymeleaf.org">
<head>
  <title>PixelTrice</title>
  <meta charset="utf-8">
  <meta name="viewport" content="width=device-width, initial-scale=1">
  <link rel="stylesheet" href="https://maxcdn.bootstrapcdn.com/bootstrap/3.4.1/css/bootstrap.min.css">
  <link rel="stylesheet" href="/css/style.css">
  <link rel="stylesheet" href="https://cdn.datatables.net/1.10.21/css/dataTables.bootstrap.min.css">
</head>
<body>
<br>
<h1 class="text-center">Spring Boot Image Gallery Application
<a href="/home" class="btn btn-danger text-right">Go Home</a>
</h1>
<br><br>

<table id="example" class="table table-striped table-bordered text-center">
        <thead>
            <tr>
                <th>SR. No.</th>
                <th>Name</th>
                <th>Image</th>
                <th>Description</th>
                <th>Price</th>
                <th>Created date</th>
                <th>Action</th>
            </tr>
        </thead>
        <tbody th:with="count=0">
        <tr th:each = "imageGallery, hh : ${images}">
                <td th:with="count=${count + 1}" th:text="${count}"></td>
                <td th:text="${imageGallery.name}"></td>
                <td><img th:src="@{${'/image/display/'+ imageGallery.id}}"
                class="card img-fluid" style="width:300px" alt=""/></td>
                <td th:text="${imageGallery.description}"></td>
                <td th:text="${imageGallery.price}"></td>
                <td th:text="${#dates.format({imageGallery.createDate}, 'dd-MM-yyyy')}"/></td>
               <td><a th:href="@{/image/imageDetails(id=${imageGallery.id})}" class="btn btn-info text-right" target="_blank">View</a></td>
            </tr>
        </tbody>
    </table>


	<script src="https://ajax.googleapis.com/ajax/libs/jquery/3.5.1/jquery.min.js"></script>
	<script src="https://cdn.datatables.net/1.10.21/js/jquery.dataTables.min.js"></script>
	<script src="https://cdn.datatables.net/1.10.21/js/dataTables.bootstrap.min.js"></script>
	<script type="text/javascript">
	$(document).ready(function() {
	    $('#example').DataTable();
	} );
	</script>
</body>
</html>
imagedetails.html
<!DOCTYPE html>
<html lang="en" xmlns:th="http://www.thymeleaf.org">
<head>
<meta charset="ISO-8859-1">
<title>PixelTrice</title>
<meta charset="utf-8">
<meta name="viewport" content="width=device-width, initial-scale=1">
<link rel="stylesheet" href="https://maxcdn.bootstrapcdn.com/bootstrap/3.4.1/css/bootstrap.min.css">
<link rel="stylesheet" href="/css/style.css">
</head>
<body>
<br>
<div class="banner-bootom-w3-agileits py-5">
<div class="container py-xl-4 py-lg-2">
<!-- tittle heading -->
<h3 class="tittle-w3l text-center mb-lg-5 mb-sm-4 mb-3">
<span>I</span>mage
<span>D</span>etails</h3><br>
<!-- //tittle heading -->
<div class="row">
<div class="col-lg-5 col-md-8 single-right-left ">
<div class="grid images_3_of_2">
<div class="flexslider">
<div class="thumb-image">
<img th:src="@{${'/image/display/'+id}}"
class="img img-responsive img-fluid" alt="">
</div>
<div class="clearfix"></div>
</div>
</div>
</div>
<div class="col-lg-7 single-right-left simpleCart_shelfItem">
Name: <span th:text="${name}" class="mb-3"></span>
<p class="mb-3">
Price :$ <span class="item_price" th:text="${price}"></span>
</p>
<div class="product-single-w3l">
Description: <span th:text="${description}" class="my-sm-4 my-3">
</span>
</div><br>
<a href="/image/show">Go Back</a>
 <a href="/">Go Home</a>
</div>
</div>
</div>
</div>
</body>
</html>
Step 11: Create css and javascript file
In this step, we will create a style.css and product.js, for our application. Also placed a loading image in the image folder.
Make sure you should create style.css in the src\main\resources\static\css and product.js in path src\main\resources\static\js
Note One more folder with named images we need to create on the path src\main\resources, where we have to store the loading image. You can download it from the source code available on my GitHub account.
product.js
   $(document).ready(function() {
    $('#loader').hide();
    $("#submit").on("click", function() {
    	$("#submit").prop("disabled", true);
    	var name = $("#name").val();
        var file = $("#image").val();
        var price = $("#price").val();
        var description = $("#description").val();
        var form = $("#form").serialize();
    	var data = new FormData($("#form")[0]);
    	data.append('name', name);
    	data.append('price', price);
    	data.append('description', description);
    	//alert(data);
        $('#loader').show();
        if (name === "" || file === "" || price === "" || description === "") {
        	$("#submit").prop("disabled", false);
            $('#loader').hide();
            $("#name").css("border-color", "red");
            $("#image").css("border-color", "red");
            $("#price").css("border-color", "red");
            $("#description").css("border-color", "red");
            $("#error_name").html("Please fill the required field.");
            $("#error_file").html("Please fill the required field.");
            $("#error_price").html("Please fill the required field.");
            $("#error_description").html("Please fill the required field.");
        } else {
            $("#name").css("border-color", "");
            $("#image").css("border-color", "");
            $("#price").css("border-color", "");
            $("#description").css("border-color", "");
            $('#error_name').css('opacity', 0);
            $('#error_file').css('opacity', 0);
            $('#error_price').css('opacity', 0);
            $('#error_description').css('opacity', 0);
                    $.ajax({
                        type: 'POST',
                        enctype: 'multipart/form-data',
                        data: data,
                        url: "/image/saveImageDetails",
                        processData: false,
                        contentType: false,
                        cache: false,
                        success: function(data, statusText, xhr) {
                        console.log(xhr.status);
                        if(xhr.status == "200") {
                        	$('#loader').hide();
                        	$("#form")[0].reset();
                        	$('#success').css('display','block');
                            $("#error").text("");
                            $("#success").html("Product Inserted Succsessfully.");
                            $('#success').delay(2000).fadeOut('slow');
                         }
                        },
                        error: function(e) {
                        	$('#loader').hide();
                        	$('#error').css('display','block');
                            $("#error").html("Oops! something went wrong.");
                            $('#error').delay(5000).fadeOut('slow');
                            location.reload();
                        }
                    });
        }
            });
        });
Note: Please refer to my Github Account for style.css code.
Now we are good to go and run the application, but before that make sure you have provided the correct MySQL username, password, and schema name.
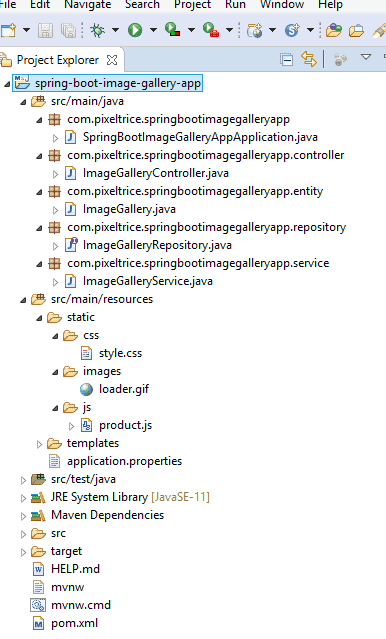
Also verify the Folder Structure as shown in figure.

Step 12: Run the Application
After running the application, add the image detail and view as shown in the figure.
Go to localhost:8080 and upload the image as shown in figure.

Press on submit button to store the image details in MySQL Database. Click on Show All button to view the image.

Click on View button to see the details of the image.

Summary
In this tutorial, we have learned and built the application to upload, store, and view the images with the use of MySQL, Thymeleaf, and Spring Boot Framework. Source code is available on my Github Account, please go through that, if stuck anywhere or getting some error. You can also ask any queries in the comment section down below.
You might also like this article.
- Spring Security LDAP Authentication Example using Spring Boot Application
- Payment Integration With Paytm in Spring Boot Application
- Send OTP(One Time Password) Using Spring Boot Application for Authentication
- Make a Voice Call from Spring Boot Application to Mobile Phone
- How to send email using Spring Boot Application
- Spring Boot Security using OAuth2 with JWT