In this article, we will learn about OAuth 2.0 from very basic levels to an advanced level. I will explain it to you in a very simple way.
So, After struggling a lot, finally, I understood in-depth about OAuth 2.0 flow and I really wanted to share with you.
Before moving to further I just wanted to let you know that you are already using an OAuth 2.0 flow in your day to day life. And it’s a high possibility you don’t aware of that. But don’t worry after reading this article you will definitely get to know.
So, Let’s begin…
Note: Video Tutorial is available in the bottom section of this article.
Suppose after reading this article on our site PixelTice.com, you wanted to share with all your friends or colleagues through email. And Consider PixelTrice provides a feature to enter the email addresses of the person to whom you want to send or share.
But the problem is that if you wanted to share with all your friends or colleagues and if we combined them all, then they might be more in numbers, let’s assume 50 in number, So it really pains to write all email address one by one and send it.
So, to handle this scenario, the website PixelTrice provides a feature to access all your contacts or email address saved in your Gmail Account. If you signup to PixelTrice with your existing Gmail Account then, it will automatically fetch you all contacts email address which is saved in your Gmail.
Now when you click on sign up button , you will redirect to screen something look like as shown below.
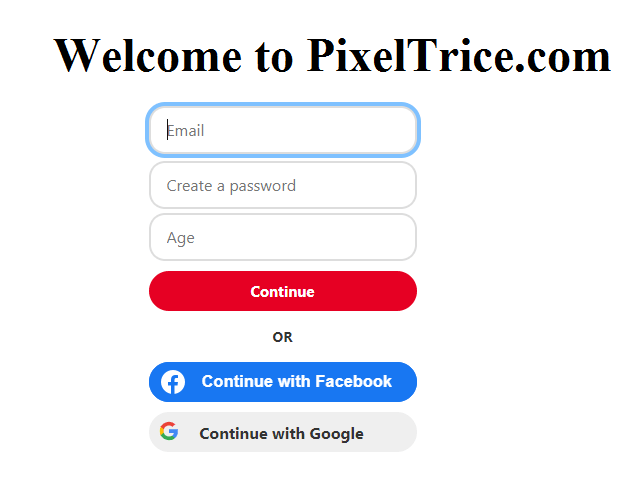
Here is the hidden secret have you ever try to figure out how you are able to sign up in other application with social media accounts. When you choose to Sign up with Google, do you know lots of things start happening behind the scene?
The things which happened behind the scene are only called OAuth 2.0 flow. Yes, you are correct, that concept is only called OAuth 2.0.
So, from the next time whenever some application asks you to signup from your social media account then you will definitely know how things are working under the hood.
Let us understand what are the things happens when you press on Continue sign up with Google.
Step 1: If you are not signed in Google then you will get the Google Sign-in Screen as shown in the below figure.
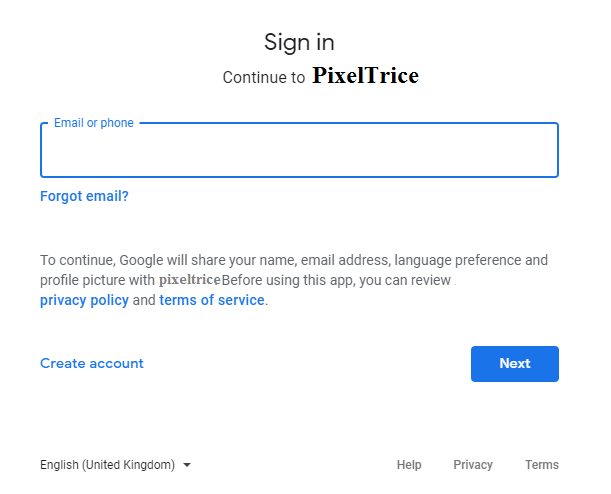
But if you are already signed in to google account then you will get the alert message similar to as shown below.
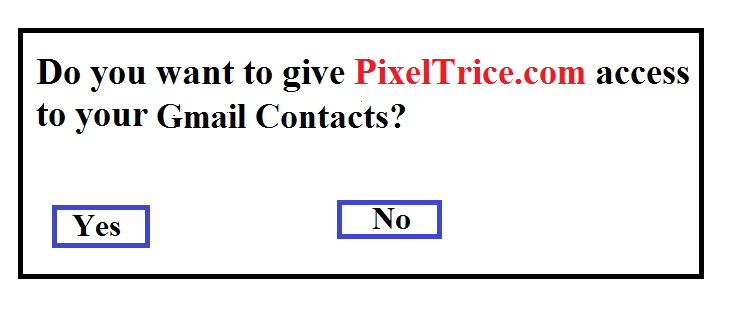
Step 2: Once you click on the Next Button or Yes, You will again redirect to the application PixelTrice HomePage.
Now you will able to see all your friend’s email addresses in the PixelTrice Home Page.
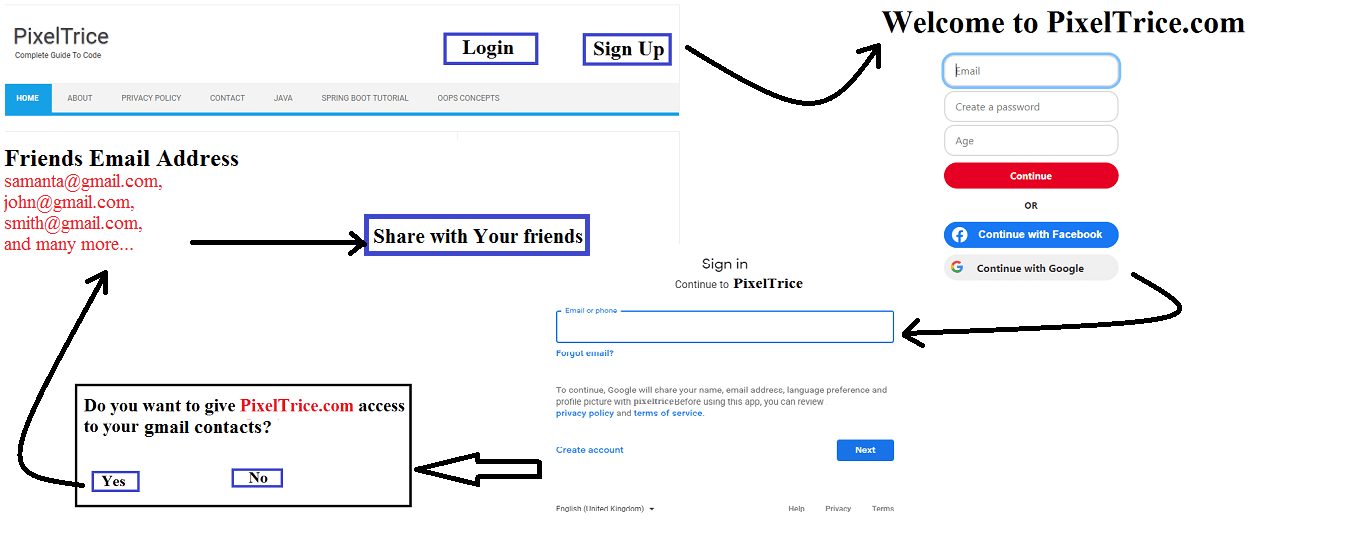
Up to now whatever we learned is a very important concept. Let’s get into deeper, and try to understand exactly what happening in a more technical way.
Before moving to the further I want to introduce you to some of the technical terms of OAuth 2.0.
- Resource Owner: You are the owner of your resources. Here resources refer to your Gmail contacts such as email addresses of your colleagues or friends. In general, the Resource Owner is the person who signup in the application.
2. Client: It is the application(PixelTrice) that tries to access the data such as, email addresses of your friends from another server(Google).
3. Authorization Server: The server in which the resource owner already has an account. In this case, Google is an Authorization Server.
4. Resource Server: The server which contains all the details of the Resource owner, In our scenario the Resource server is defined in Google itself, which contains API to give the resource owner Gmail constants details.
Note: The client can able to access the Resource Server only it went through the Authorization Server.
5. Redirect URI or Callback URL: When you successfully sign up with Google, it will redirect to the Client application that is PixelTrice in our case.
6. Response Type: At the time of Redirect the Authorization Server attached some code along with Redirect URL which technically called Authorization Code.
Note: This Authorization code is required to access the Resource Server or the API which contains the Resource owner Gmail contacts details.
7. Scope: This term used to define the scope of the permission given to client application by the Authorization Server. The scope can be read, write, update, or delete.
It means that when the Authorization Server(Google) given permission to only read the data, then the Client(PixelTrice) application, can only read the data and display it in their application.
8. Consent: Suppose the client requested from the authorization server to provides scope or permission to update the data. Then the authorization server will look in to and decide that this client request is accepted or not.
9. Client ID: This Id is given by the Authorization server to the client. So, that the Authorization server knows the client.
10. Client Secret: It is a secret password that only known to the client and authorization server. With the help of this both privately and securely exchange the information.
11. Authorization Code: This is a code which first provides by Authorization Server to the Client, and at the time of accessing the resource server, it is exchanged with the Access Token.
12. Access Token: This is a token used by the Client to access the Resource server or data to perform any actions.
OAuth 2.0 Flow Diagram
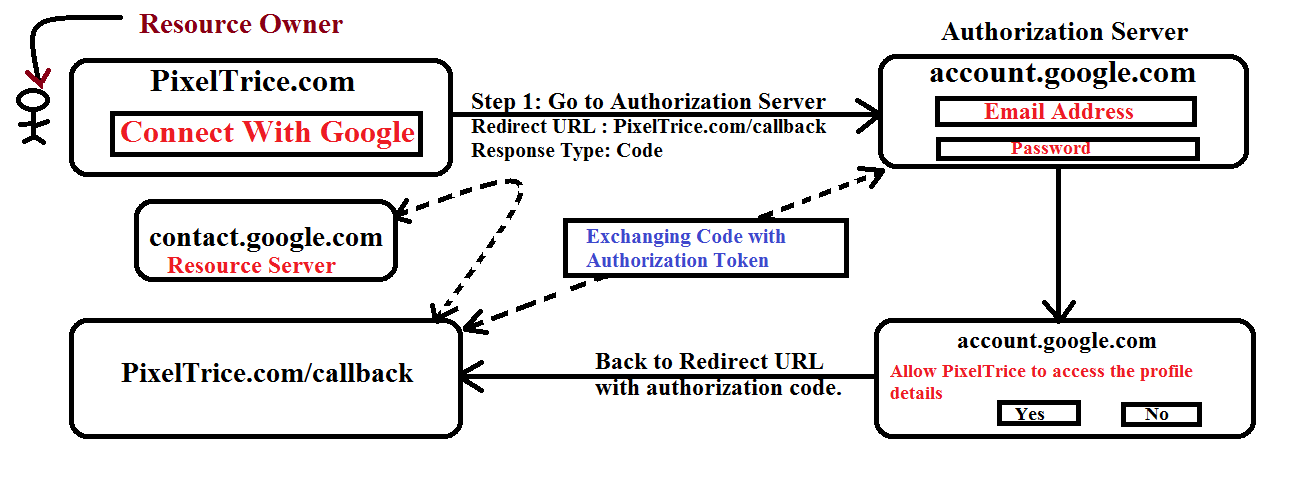
Explanation of OAuth 2.0 Diagram
In this section I will explain you in a technical way.
Step 1: Resource Owner choose to Sign up with Google.
In this step when the Resource owner clicks on Connect with Google button, then request will go to the Authorization Server along with Redirect URL and Response Type.
Redirect URL: The URL on which Authorization Server will redirect after the successful sign-up.
Response Type: At the time of Redirect, the Authorization Server provides some information in the form of code or token, but in our case, we define Response Type as Authorization Code.
Step 2: Enter a Email Address and Password.
Once you enter your Google email address and password, the Authorization Server(Google) will ask you a final time whether you are allowing the client application to access the Gmail contacts.
Step 3: Redirect on the URL which provided in Step 1.
In this step, once you click on the Yes button, the Authorization Server Redirect to the URL which provided in Step 1. And since we also mentioned the Response Type as code in Step 1. So the Authorization Server provides an Authorization Code along with Client ID and Secret Id to the Client Application.
Step 4: Exchange of Authorization Code with Access Token.
Up to Step 3, all the exchanges done through the Client’s browser, which is really not safe, might be stolen by someone.
So in this step, Client Application will secretly contact the Authorization Server(without the use of the Client’s browser) using an Authorization Code, Client ID, and Client Secret.
Authorization Server verifies Client information such as authorization code, Client ID, Client Secret and in exchange of authorization code, the authorization server provides the access token to the client app.
Step 5: Client will access the Resource Server based on Token.
In this step, the Client will call the API or resource server, which provides the Gmail contacts or email address of friends or colleagues in the form of response.
Note: Since the scope, we mentioned in Step 1 is read-only, That means the Client application can only fetch the data and display to their screen, they are not able to modify or delete the data.
Step 6: Display the data on the Client Application.
Once the Client app gets all the data, it will display on their screen and You as a Resource Owner will easily share the articles with your friends.
Great! I hope you got some clear idea of how OAuth 2.0 flow works and solved your big problem, but that’s not an end my lovely readers, one very important part still need to be covered.
Yes, and that is OpenID Connect.
OAuth 2.0 is completely designed for Authorization, which means it only provides permission to access some feature or component from one application to another.
OpenID Connect is just an additional layer on the top of the OAuth 2.0 which provides the sign-in feature and the profile information of the signed in person.
We do sign in for authenticating the right person(Resource Owner) with their profile information that is called Identity.
If we combined the Authorization Server and OpenID Connect then it sometimes called Identity Provider because it providing profile details of the Resource Owner.
The flow for OpenID Connect is exactly the same as OAuth 2.0, the only difference is in Step 1 and Step 4. In Step 1, along with the Redirect URL and Response Type, we need to also mention the Scope and the value needs to assign is the OpenID profile.
And in Step 4, this time Authorization Server gives the ID Token(JWT) along with the Access Token.
Final OAuth 2.0 + Open ID Connect Flow Diagram
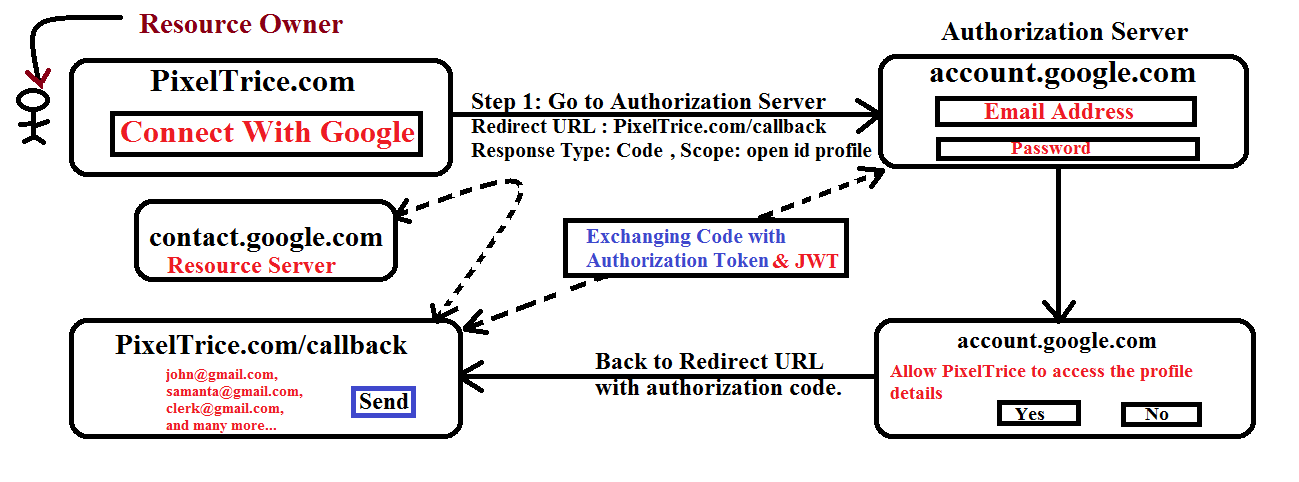
Here you need to understand the difference between both Access Token and ID Token.
Access Token is just a key that passed to the Resource Server and Resource Server verifies that the token is valid or not to provide access to the requested API.
But ID Token is just a formatted String and that we called JSON Web Token (JWT).
JSON Web Token (JWT TOKEN)
It is ID Token which contains all profile details of the Resource owner such as name, user id, profile picture, token expiry time, and even if the client wants more information such as email address of the Resource owner, then it can request from Authorization Server to get it.
JWT is in the form of formatted String which we as a human cannot understand, but the client application can easily understand.
JSON Web Tokens is a combination of three parts and all are separated by a dot(.)
- Header
- Payload
- Signature
Hence, JWT is look like aaaa.bbbb.cccc
Summary
Thank You so much for reading my article. I hope you got a clear understanding of the OAuth 2.0 flow and how it is working. If you have any queries or doubt please feel free to ask in the comment section. I will definitely answer your queries.
You might also like this article.
- Make a Voice Call from Spring Boot Application to Mobile Phone
- Send an SMS or Message from Spring Boot Application to Mobile Phone
- How to send email using Spring Boot Application
- Spring Boot Security using OAuth2 with JWT
- Build Spring Boot Restful CRUD API with Hibernate and Postgresql from scratch
- Deploy the Spring Boot Application on External Tomcat Server