In this article, we will build the spring boot application from scratch and implement the Google ReCaptcha validation for the new employee registration to our application. Basically, ReCaptcha validation is done to prevent the robot from sending the data through POST Request.
I will explain each and everything in details along with the source code, please follow the below-mentioned steps in order to build the application.
Final Project
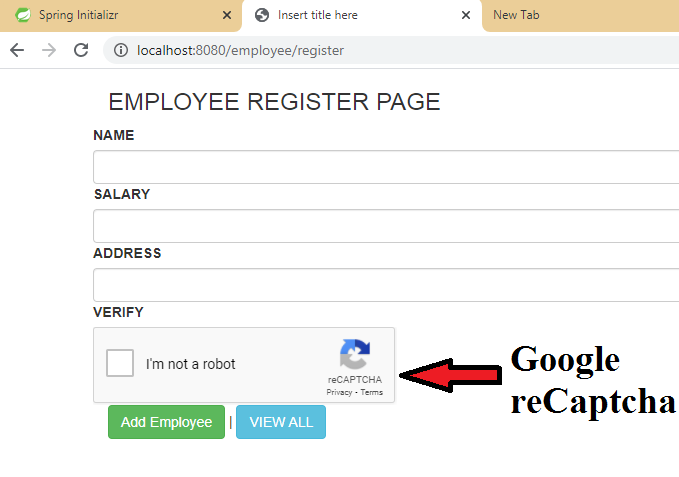
Note: Source Code is available in the bottom section of this article.
Video Tutorial available in bottom section.
Step 1: Create a Project from Spring Initializr.
- Go to the Spring Initializr.
- Enter a Group name, com.pixeltrice.
- Mention the Artifact Id, spring-boot-reCaptcha-validation-app
- Add the following dependencies,
- Spring Web.
- Thymeleaf.
- Spring Data JPA.
- MySQL Driver.
Step 2: Click on the Generate button, the project will be downloaded on your local system.
Step 3: Unzip and extract the project.
Step 4: Import the project in your IDE such as Eclipse.
Select File -> Import -> Existing Maven Projects -> Browse -> Select the folder spring-boot-reCaptcha-validation-app -> Finish.
Step 5: Configure the properties in application.properties
In step we will configure the data source properties.
spring.datasource.url= jdbc:mysql://localhost:3306/captchaApp
spring.datasource.username= your mysql database username
spring.datasource.password= database password

spring.jpa.properties.hibernate.dialect= org.hibernate.dialect.MySQL5InnoDBDialect

# Hibernate ddl auto (create, create-drop, validate, update)
spring.jpa.hibernate.ddl-auto= update
Data Source Properties
I am using MySQL as a data source for storing the Employee Details.
- spring.datasource.url: It contains the URL to connect with the database or schema in the MySQL Workbench.
- spring.datasource.username: Username to access the database.
- spring.datasource.password: Password of the database.
JPA Properties
Since we are using a Hibernate as JPA, to perform all SQL or database operation, so all the important properties we have configured in this section.
- spring.jpa.hibernate.ddl-auto= update, Since we have set the value update, then Hibernate will automatically create a table in the database based on the Entity class and also do update automatically whenever any changes done in the Entity class.
Step 6: Create the Model or Entity Class for Employee Details
In this step, we will create a class that will be mapped with the MySQL database table.
EmployeeEntity.java
package com.pixeltrice.springbootreCaptchavalidationapp;

import javax.persistence.Entity;
import javax.persistence.GeneratedValue;
import javax.persistence.Id;
import javax.persistence.Table;

@Entity
@Table(name = "employee")
public class EmployeeEntity {

	@Id
	@GeneratedValue
	private Integer id;
	private String name;
	private Double salary;
	private String address;
	public Integer getId() {
		return id;
	}

//Getter and Setter Method
@Table annotation indicates the database table name which mapped with the above Entity class.
@Id annotation has used for representing the variable as a primary key in the table.
And the last annotation that is @Column is used to represent the name of the column which mapped with the mentioned variables or fields. But if you did not tag or specify the variable with @Column then it will create the column with the same name as of variable.
Step 7: Create a class to declare the ReCaptcha variables.
Here we are declaring some variables that can be used to display the message after the ReCaptcha validation.
ReCaptchResponseType.java
package com.pixeltrice.springbootreCaptchavalidationapp;

public class ReCaptchResponseType {

	private boolean success;
	private String challenge_ts;
	private String hostname;

	public boolean isSuccess() {
		return success;
	}
	public void setSuccess(boolean success) {
		this.success = success;
	}
	public String getChallenge_ts() {
		return challenge_ts;
	}
	public void setChallenge_ts(String challenge_ts) {
		this.challenge_ts = challenge_ts;
	}
	public String getHostname() {
		return hostname;
	}
	public void setHostname(String hostname) {
		this.hostname = hostname;
	}
}
Step 8: Create a Repository Interface for Employee Entity Class
In this step, we will create the Repository which used to communicate with the database and perform all types of CRUD Operations. In this step we will extend one predefined class named JpaRepository which provides all possible methods required to Create, Delete, Update, and fetch the data from the database table.
EmployeeRepository.java
package com.pixeltrice.springbootreCaptchavalidationapp;

import org.springframework.data.jpa.repository.JpaRepository;
import org.springframework.stereotype.Repository;

@Repository
public interface EmployeeRepository extends JpaRepository<EmployeeEntity, Integer>
{

}
Step 9: Create a Service class for the Captcha Validation.
In this step, we will define the method for validating the captcha value which has been received to our application at the time employee registration. Still, we did not create an API to save the new employee detail. So, in the next step, we will Controller class to define all the necessary API.
ReCaptchaValidationService.java
package com.pixeltrice.springbootreCaptchavalidationapp;

import org.springframework.stereotype.Service;
import org.springframework.util.LinkedMultiValueMap;
import org.springframework.util.MultiValueMap;
import org.springframework.web.client.RestTemplate;

@Service
public class ReCaptchaValidationService {

private static final String GOOGLE_RECAPTCHA_ENDPOINT = "https://www.google.com/recaptcha/api/siteverify";

private final String RECAPTCHA_SECRET = "Your google recaptcha secret";

    public boolean validateCaptcha(String captchaResponse){
        RestTemplate restTemplate = new RestTemplate();

        MultiValueMap<String, String> requestMap = new LinkedMultiValueMap<>();
        requestMap.add("secret", RECAPTCHA_SECRET);
        requestMap.add("response", captchaResponse);

        ReCaptchResponseType apiResponse = restTemplate.postForObject(GOOGLE_RECAPTCHA_ENDPOINT, requestMap, ReCaptchResponseType.class);
        if(apiResponse == null){
            return false;
        }

        return Boolean.TRUE.equals(apiResponse.isSuccess());
    }
}
If you noticed, in the above code I have uses two final variables.
- private static final String GOOGLE_RECAPTCHA_ENDPOINT.
- private final String RECAPTCHA_SECRET.
The value assigned to them is collected from the Google ReCaptcha Site: https://www.google.com/recaptcha/admin
As I told you earlier that we are going to use the Google ReCaptcha services for validation purposes. So, let’s follow the below mention steps to get the key details from Google ReCaptcha.
Step 10: Create an Account on Google ReCAPTHA.
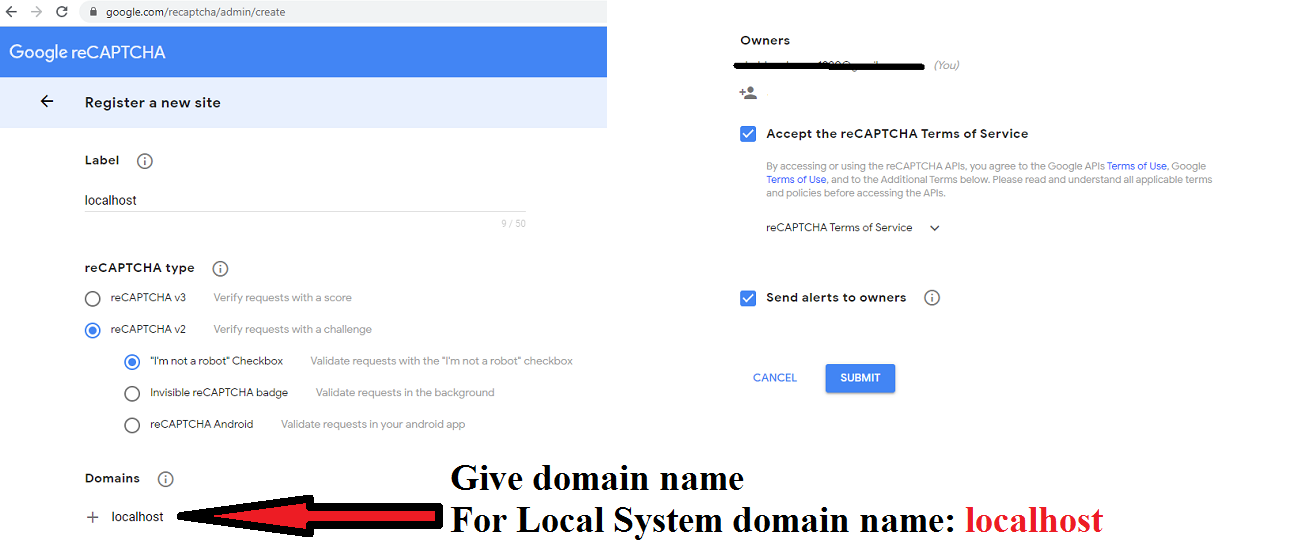
Go to https://www.google.com/recaptcha/admin and create an account. Enter the required fields as shown in the figure.
And once you click on the submit button, you will redirect to the page where get the two Keys.
- Site Key: It should be placed in the .html file or client-side.
- Secret Key: It should be placed in the server side as shown in above class ReCaptchaValidationService.java
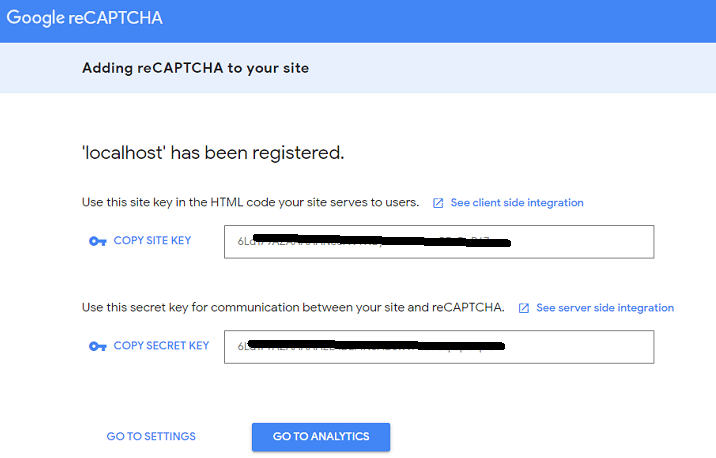
Note: In further steps I will show you where to place the Site Key in html file.
Step 11: Create an Employee Controller Class
In the Controller class, we will define the APIs to fetch all stored employee details from the MySQL Database and also save the new employee detail.
EmployeeController.java
package com.pixeltrice.springbootreCaptchavalidationapp;

import org.springframework.beans.factory.annotation.Autowired;
import org.springframework.stereotype.Controller;
import org.springframework.ui.Model;
import org.springframework.web.bind.annotation.GetMapping;
import org.springframework.web.bind.annotation.ModelAttribute;
import org.springframework.web.bind.annotation.PostMapping;
import org.springframework.web.bind.annotation.RequestMapping;
import org.springframework.web.bind.annotation.RequestParam;

@Controller
@RequestMapping("/employee")

public class EmployeeController {

	@Autowired
	private ReCaptchaValidationService validator;

	@Autowired
	private EmployeeRepository employeeRepository;

	 @GetMapping("/register")
	 public String showRegister(Model model)
	 {
		 model.addAttribute("employee", new EmployeeEntity());
		 return "EmployeeRegister";
	  }

	 @PostMapping("/save")
	 public String saveEmployee(@ModelAttribute("employee")
	 EmployeeEntity employee,

	 @RequestParam(name="g-recaptcha-response")
	 String captcha, Model model)
	 {
		 if(validator.validateCaptcha(captcha))
	        {
			 employeeRepository.save(employee);
			 model.addAttribute("employee", new EmployeeEntity());
			 model.addAttribute("message", "Employee added!!");
			 }
		     else {
		    	 model.addAttribute("message", "Please Verify Captcha");
		    	 }
		 return "EmployeeRegister";
	}

	 @GetMapping("/all")
	 public String getAllEmployees(Model model)
	 {
		 model.addAttribute("list", employeeRepository.findAll());
         return "EmployeeData";

	 }
	}
Since we are using thymeleaf so all mentioned methods will return the .html file. For example, showRegister() method will return the EmployeeRegister.html, similarly getAllEmployees() will return the EmployeeData.html
Hence we need to create html files.
Step 12: Create the HTML Files.
We have to create the html file in the following path, /src/main/resources/templates
EmployeeRegister.html
<!DOCTYPE html>
 <html xmlns:th="https://www.thymeleaf.org/">
 <head>
   <title>Insert title here</title>
    <link href="//netdna.bootstrapcdn.com/bootstrap/3.0.0/css/bootstrap.min.css" rel="stylesheet" id="bootstrap-css"/>
    <script src="//netdna.bootstrapcdn.com/bootstrap/3.0.0/js/bootstrap.min.js"></script>
     <script src="https://www.google.com/recaptcha/api.js" async defer></script>
 </head>
  <body>
     <div class="container">
        <div class="card">
            <div class="card-header bg-primary text-white">
                 <h3>EMPLOYEE REGISTER PAGE</h3>
             </div>
           <div class="card-body">
              <form th:action="@{/employee/save}" method="POST" th:object="${employee}">
                   <div class="row">
                       <div class="col-2">
                            <label>NAME</label>
                        </div>
                         <div class="col-4">
                             <input type="text" th:field="*{name}" class="form-control" />
                          </div>
                    </div>
                    <div class="row">
                           <div class="col-2">
                              <label>SALARY</label>
                             </div>
                             <div class="col-4">
                                   <input type="text" th:field="*{salary}" class="form-control" />
                               </div>
                    </div>
                                       <div class="row">
                                            <div class="col-2">

       <label>ADDRESS</label>
             </div>
                  <div class="col-4">
                    <input type="text" th:field="*{address}" class="form-control" />
                          </div>
                             </div>
                    <div class="row">
                     <div class="col-2">
                      <label>VERIFY</label>
                         </div>
                        <div class="col-4">
  <div class="g-recaptcha"
data-sitekey="6L6ghjutru3t3ygf33f887tghjgnghvbnbvrrtPEnDaR67">
 </div>
                                     </div>
                                         </div>
         <input type="submit" value="Add Employee" class="btn btn-success" />
          | <a th:href="@{/employee/all}" class="btn btn-info">VIEW ALL</a>
       </form>
         <br/>
            <div th:if="${message!=null}">
         <span class="alert alert-danger" th:text="${message}"></span>
              </div>
                 </div>
                  </div>
                    </div>
                     </body>
       </html>
If you noticed in the above code there is “data-siteKey” in the div tag, just replace the value with your siteKey which you have got from the Google ReCaptcha.
<div class="g-recaptcha"
data-sitekey="6L6ghjutru3t3ygf33f887tghjgnghvbnbvrrtPEnDaR67">
 </div>
EmployeeData.html
<!DOCTYPE html> <html xmlns:th="https://www.thymeleaf.org/">
 <head> <title>Insert title here</title>
  <link href="//netdna.bootstrapcdn.com/bootstrap/3.0.0/css/bootstrap.min.css" rel="stylesheet" id="bootstrap-css"/>
    <script src="//netdna.bootstrapcdn.com/bootstrap/3.0.0/js/bootstrap.min.js"></script>
   </head>
   <body>
     <div class="container">
      <div class="card">
        <div class="card-header bg-primary text-white">
           <h3>EMPLOYEE REGISTER PAGE</h3>
       </div>
       <div class="card-body">
          <table class="table">
             <tr>
                 <th>ID</th>
                 <th>NAME</th>
                 <th>SALARY</th>
                 <th>ADDRESS</th>
             </tr>
              <tr th:each="ob:${list}">
                  <td th:text="${ob.id}"></td>
                  <td th:text="${ob.name}"></td>
                  <td th:text="${ob.salary}"></td>
                  <td th:text="${ob.address}"></td>
               </tr>
             </table>
          </div>
         </div>
        <br/>
         <a th:href="@{/employee/register}" class="btn btn-info">ADD</a>
        </div>
      </body>
     </html>
Alright, we are good to go and run the application, but before running this, make sure all values of application.properties are correct.
- spring.datasource.url
- spring.datasource.username
- spring.datasource.password
Step 13: Run the Application.
Go to http://localhost:8080/employee/register, you will get the screen as shown below.
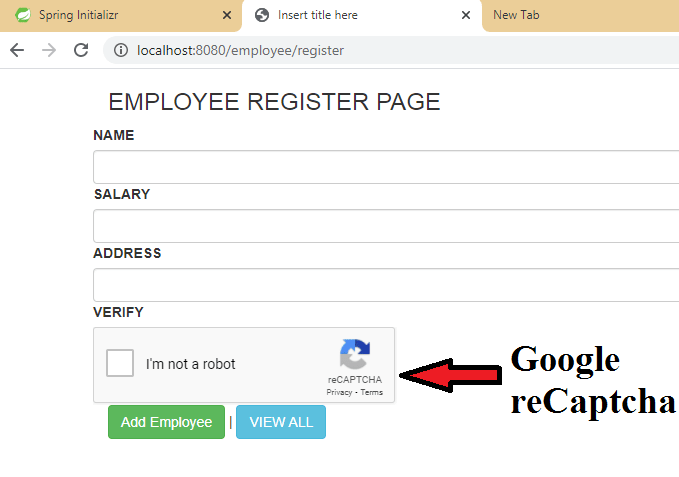
After entering all the details click on the Add button to save the information in MySQL Database.
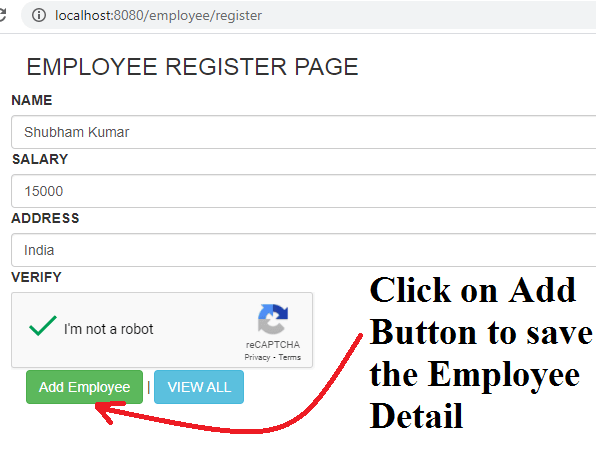
Click on view button to get the list of all saved employee.

Summary
In this article, we have learned to implement the Google reCaptcha in our spring boot application. If you have any queries or doubt please feel free to ask me anytime. I will love to help you.
You might also like this article.
- Build Spring Boot Chat Application from scratch
- Payment Integration With Paytm in Spring Boot Application
- Send OTP(One Time Password) Using Spring Boot Application for Authentication
- Make a Voice Call from Spring Boot Application to Mobile Phone
- How to send email using Spring Boot Application
- Spring Boot Security using OAuth2 with JWT
Sir i am not getting any images when i am click on i am not a Robot logo .
Will please give any solution to this problem
Hi Sontosh, What error are you getting in the eclipse console or IDE console? Can you share with me please?
Can I suggest you, please try to find the solution with yourself, it will give you a lot of confidence as a developer. Follow the below steps to tackle any issue you faced in coding level,
1) Debug in the code and try to find exactly where or which API or which line of code given error or not working.
2) Try to search on the internet with the same error message (if the message is displaying your IDE Console screen).
3) Use StackOverflow.
4) Always prefer to check once official documentation related to the feature you have implemented. For example in ReCaptcha, we have implemented the Google ReCaptcha feature, please check the official documentation once and verify everything is correct.
Note: Above are just my suggestion Sontosh. Of Course, I will also help you.
Sir, is there any application where we can deploy our application freely
Hi Sontosh, yes there is some platform which provides free deployment of projects but still there is some limitation on every free platform, I have deployed my spring boot chat application on Heroku platform. You can check through this link: https://spring-boot-chat-application.herokuapp.com/
Apart from that Microsoft azure also provide a free platform(up to 12 months) for deployment.Similarly many more platforms out there in the market.