In this article, we will learn to send SMS from the Spring Boot Application. Here I am using a third-party tool named Twilio along with Spring Boot Application which provides a feature to make a voice call and send the SMS.
Final Spring Boot Application

Note: Video Tutorial is available in the bottom of this article.
Please follow the below mentioned steps.
Step 1: Create a maven project from Spring Initialzr.
Step 2: Enter the name in following fields.
- Group: com.pixeltrice
- Artifact: spring-boot-OTP-app
- Add the following dependencies: Spring Web, WebSocket.
Step 3: Click on the Generate Project button. The project will start downloading on the bottom left corner of your screen.
Step 4: Uzip and extract the project in your local system.
Step 5: Import the project in the IDE such as Eclipse.
Select File -> Import -> Existing Maven Projects -> Browse -> Select the folder spring-boot-OTP-app-> Finish.
Step 6: Create a class to Configure the WebSocket.
package com.pixeltrice.springbootOTPapp;

import org.springframework.context.annotation.Configuration;
import org.springframework.messaging.simp.config.MessageBrokerRegistry;
import org.springframework.web.socket.config.annotation.EnableWebSocketMessageBroker;
import org.springframework.web.socket.config.annotation.StompEndpointRegistry;
import org.springframework.web.socket.config.annotation.WebSocketMessageBrokerConfigurer;

@Configuration
@EnableWebSocketMessageBroker
public class WebSocketConfig implements WebSocketMessageBrokerConfigurer {

    @Override
    public void configureMessageBroker(MessageBrokerRegistry config) {
        config.enableSimpleBroker("/lesson");
        config.setApplicationDestinationPrefixes("/app");
    }

    @Override
    public void registerStompEndpoints(StompEndpointRegistry registry) {
        registry.addEndpoint("/gs-guide-websocket").withSockJS();
    }

}
Explanation of each line of code
@EnableWebSocketMessageBroker: This annotation is used to enabled the web socket in our application.
class WebSocketConfig implements WebSocketMessageBrokerConfigurer: We implemented a WebSocketMessageBrokerConfigurer interface because it contains methods to configure or established the connection with WebSocket.
configureMessageBroker(): This method is used to route or send the message received from one client to the other client.

config.enableSimpleBroker(“/lesson”): This is used to enabling the message broker to the mentioned endpoint. For example, if any message whose endpoints start with /lesson, then it will redirect to the message broker, and the message broker will route or send the messages to all the subscribed or registered clients.
config.setApplicationDestinationPrefixes(“/app”): Once the message has been processed, controller will send to the broker channel.
registerStompEndpoints(): This method used for registering the WebSocket endpoints or API which the client used to connect our WebSocket Server. So in the above code, the name of that endpoint is “/gs-guide-websocket”.
Hava you notice in the above code we are also using withSockJS() with the registry.addEndpoint(“/gs-guide-websocket”).withSockJS(). The purpose of SockJS(), to enable the feature of return back or fall back if the browser does not support WebSocket.
Stomp: This word in the method registerStompEndpoints() signify that it derived from STOMP implementation which is present in Spring Framework. The full form or acronym of this word is the Simple Text Oriented Messaging Protocol. It is just a protocol to send and receive the message data.
Step 7: Add two more dependencies in your pom.xml file
- Dependency for Thymeleaf.
<dependency>
    <groupId>org.springframework.boot</groupId>
    <artifactId>spring-boot-starter-thymeleaf</artifactId>
    <version>2.3.3.RELEASE</version>
</dependency>
2. Twilio Dependency
<dependency>
    <groupId>com.twilio.sdk</groupId>
    <artifactId>twilio</artifactId>
    <version>7.1.0</version>
</dependency>
Step 8: Create a POJO Class for declaring the message and to variables as shown in the below code.
package com.pixeltrice.springbootOTPapp;

public class SmsPojo {

	private String to;
    private String message;

	public String getTo() {
		return to;
	}
	public void setTo(String to) {
		this.to = to;
	}
	public String getMessage() {
		return message;
	}
	public void setMessage(String message) {
		this.message = message;
	}

}
Step 9: Create a controller class for SMS.
package com.pixeltrice.springbootOTPapp;

import java.time.LocalDateTime;
import java.time.format.DateTimeFormatter;

import org.springframework.beans.factory.annotation.Autowired;
import org.springframework.http.MediaType;
import org.springframework.messaging.simp.SimpMessagingTemplate;
import org.springframework.util.MultiValueMap;
import org.springframework.web.bind.annotation.RequestBody;
import org.springframework.web.bind.annotation.RequestMapping;
import org.springframework.web.bind.annotation.RequestMethod;
import org.springframework.web.bind.annotation.RestController;

@RestController
public class SMSController {

	@Autowired
    SMSService service;

    @Autowired
    private SimpMessagingTemplate webSocket;

    private final String  TOPIC_DESTINATION = "/lesson/sms";

    @RequestMapping(value = "/sms", method = RequestMethod.POST,
            consumes = MediaType.APPLICATION_JSON_VALUE, produces = MediaType.APPLICATION_JSON_VALUE)
    public void smsSubmit(@RequestBody SmsPojo sms) {
        try{
            service.send(sms);
        }
        catch(Exception e){

            webSocket.convertAndSend(TOPIC_DESTINATION, getTimeStamp() + ": Error sending the SMS: "+e.getMessage());
            throw e;
        }
        webSocket.convertAndSend(TOPIC_DESTINATION, getTimeStamp() + ": SMS has been sent!: "+sms.getTo());

    }

    @RequestMapping(value = "/smscallback", method = RequestMethod.POST,
            consumes = MediaType.APPLICATION_FORM_URLENCODED_VALUE, produces = MediaType.APPLICATION_JSON_VALUE)
    public void smsCallback(@RequestBody MultiValueMap<String, String> map) {
       service.receive(map);
       webSocket.convertAndSend(TOPIC_DESTINATION, getTimeStamp() + ": Twilio has made a callback request! Here are the contents: "+map.toString());
    }

    private String getTimeStamp() {
       return DateTimeFormatter.ofPattern("yyyy-MM-dd HH:mm:ss").format(LocalDateTime.now());
    }
}
Explanation of each line of Code.
- First method Explanation.
 @RequestMapping(value = "/sms", method = RequestMethod.POST,
            consumes = MediaType.APPLICATION_JSON_VALUE, produces = MediaType.APPLICATION_JSON_VALUE)
    public void smsSubmit(@RequestBody SmsPojo sms) {
        try{
            service.send(sms);
        }
        catch(Exception e){

            webSocket.convertAndSend(TOPIC_DESTINATION, getTimeStamp() + ": Error sending the SMS: "+e.getMessage());
            throw e;
        }
        webSocket.convertAndSend(TOPIC_DESTINATION, getTimeStamp() + ": SMS has been sent!: "+sms.getTo());

}@RequestMapping: This annotation make sure that whenever POST request comes from /sms endpoint or API, then It accepts the JSON parameter in and produces the response in the form of JSON. At the same when the request comes on /sms endpoint, it will be mapped with the method smsSubmit() .
@RequestBody: Whatever the request parameters received from UI or FrontEnd, it will mapped to the SmsPojo class Object.
service.send(sms): When we received the message and to parameters from UI side, and after mapping it with SmsPojo Object, we are calling a send(sms) method which is present in the service class, Yet we didn’t create a service class, but in next step will create a service class for sending SMS.
This method will send the SMS message to the number which you provides in to parameter from the UI side. Actually here the SMS will send from Twilio phone number.
As we are using the Twilio service with Spring Boot, so first we need to register in Twilio, and once the registration will be done, the Twilio will send the SMS on behalf of you.
webSocket.convertAndSend(): This method calling statement is used to send the message to all the registered or subscribed clients.
2. Second Method Explanation.
 @RequestMapping(value = "/smscallback", method = RequestMethod.POST,
            consumes = MediaType.APPLICATION_FORM_URLENCODED_VALUE, produces = MediaType.APPLICATION_JSON_VALUE)
    public void smsCallback(@RequestBody MultiValueMap<String, String> map) {
       service.receive(map);
       webSocket.convertAndSend(TOPIC_DESTINATION, getTimeStamp() + ": Twilio has made a callback request! Here are the contents: "+map.toString());
    }
Once the message delivered, then smsCallback() will return back the message details to the web browser or UI from where the message has been sent.
Since we are using localhost:8080, so might not receive the callback message, because it only running on your local system. But when you deployed your code on a real production environment then definitely you will get the callback message.
Step 10: Create a Service class for the SMS.
package com.pixeltrice.springbootOTPapp;

import org.springframework.beans.factory.annotation.Value;
import org.springframework.stereotype.Component;
import org.springframework.util.MultiValueMap;
import com.twilio.Twilio;
import com.twilio.rest.api.v2010.account.Message;
import com.twilio.type.PhoneNumber;


@Component
public class SmsService {


	    private final String ACCOUNT_SID ="enter your SID Number from Twilio";

	    private final String AUTH_TOKEN = "enter your Auth token from Twilio Account";

	    private final String FROM_NUMBER = "enter the phone number generated from Twilio";

	    public void send(SmsPojo sms) {
	    	Twilio.init(ACCOUNT_SID, AUTH_TOKEN);

	        Message message = Message.creator(new PhoneNumber(sms.getTo()), new PhoneNumber(FROM_NUMBER), sms.getMessage())
	                .create();
	        System.out.println("here is my id:"+message.getSid());// Unique resource ID created to manage this transaction

	    }

	    public void receive(MultiValueMap<String, String> smscallback) {
	    }

}
Explanation of each line of code.
- ACCOUNT_SID, AUTH_TOKEN, FROM_NUMBER: As I told you earlier we are using Twilio for sending the SMS Messages, so when you registered on Twilio account you will get the ACCOUNT_SID, AUTH_TOKEN, and FROM_NUMBER. Just copy and paste the actual data from Twilio.
Please signup to Twilio.
Note: Twilio will provide you a different mobile number, so just assign that number in the variable FROM_NUMBER.
2. Explanation of send() method:
public void send(SmsPojo sms) {
	    	Twilio.init(ACCOUNT_SID, AUTH_TOKEN);

	        Message message = Message.creator(new PhoneNumber(sms.getTo()), new PhoneNumber(FROM_NUMBER), sms.getMessage())
	                .create();
	        System.out.println("here is my id:"+message.getSid());// Unique resource ID created to manage this transaction

	    }
Twilio.init(ACCOUNT_SID, AUTH_TOKEN): This will initialize the Twilio in Spring Boot Application.
Message.creator(): In this method, we are passing all necessary credentials details such as SMS text, phone number, etc. and finally it will send the SMS to the mentioned mobile number in the to variable.
Note: You have to first registered on Twilio for getting the AUTH Token ,SID.
Final Folder Structure

Step 11: Run the Application and Test it From POSTMAN.
Hit the following URL or API from POSTMAN localhost:8080/sms along with the following parameters. As shown in the figure.
{
    "to":"+9199999999999",
    "message":" Sending the message from spring boot"
}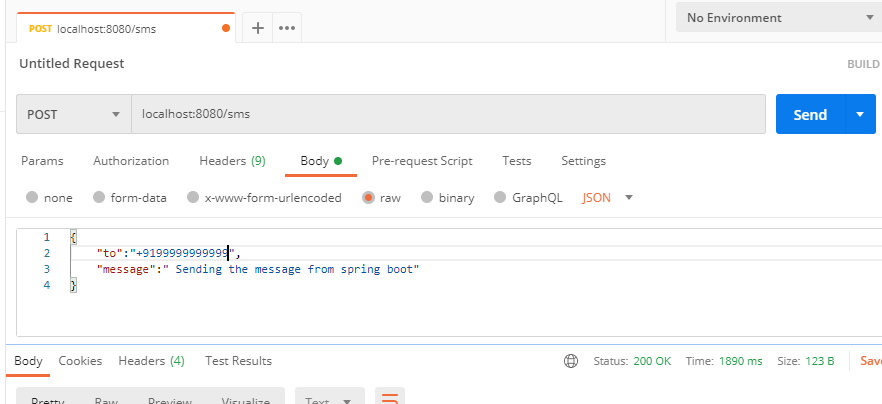
Note: Make sure you should a country code before entering your mobile number. For example, if you are from the USA, then the number must start with +1, for India is +91, similarly for other countries.
If you followed each and every step then you will definitely get an SMS on your mentioned mobile number. Please check your mobile phone.

Optional Step
Step 12: Create a Simple UI or Front End.
This step is completely optional, if you are not interested then, no problem. But if you know a little bit of HTML, Javascript or jquery then you will easily understand the code.
Note: If you want the code for the front end, please Download the Source code from the below link.
You just need to add two files for the front end that is index.html, and main.js in following path src\main\resources\static under eclipse workspace.
Summary
In this tutorial, we learned to Send an SMS or Message from Spring Boot Application to Mobile Phone. If you faced any problem, please feel free to comment down below. I will definitely reply back to you.
Checkout my other Spring Boot articles.
- Upload and download the files using Spring Boot Application
- Build Spring Boot Restful CRUD API with Hibernate and Postgresql from scratch
- Spring Boot Security using OAuth2 with JWT
- Deploy the Spring Boot Application on External Tomcat Server
- How to send email using Spring Boot Application
- Run Application from Spring Boot CLI
- How to develop Spring Boot Web Application using Thymeleaf
Great job.. This article is very clear and easy to understand. You have a profound knowledge on the subject. Thanks for sharing it.
Thanks Deepak